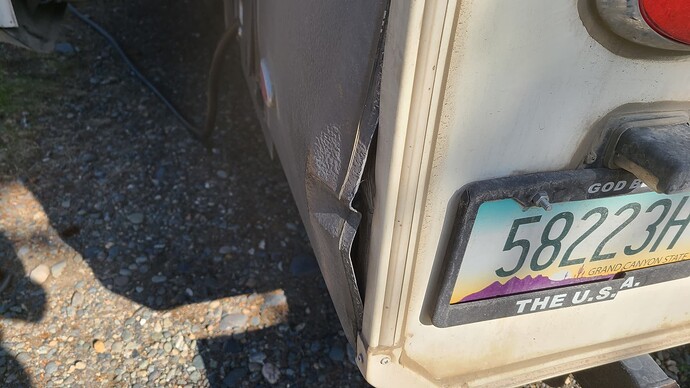
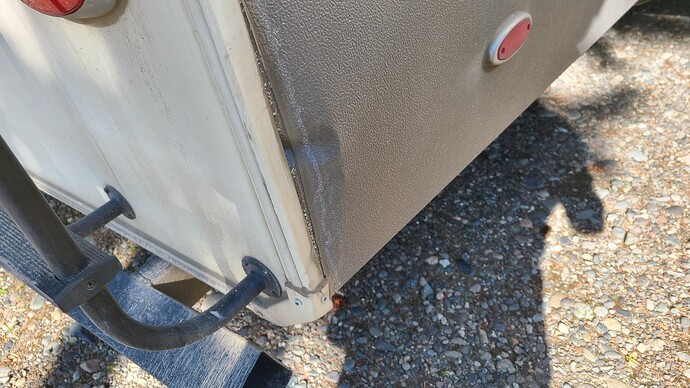
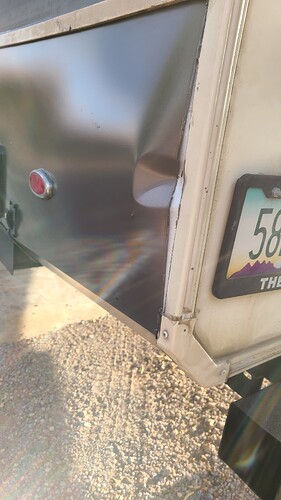
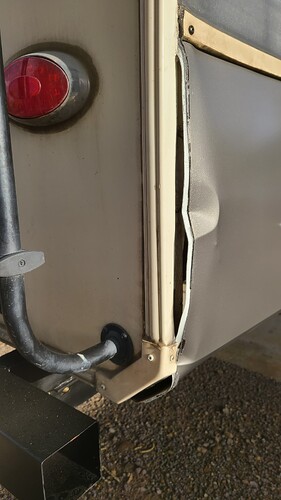
I just recently had my 2020 Vilano repaired in Tucson at a repair shop that replaced the bowed out panels. Driving my unit home less than 10 miles and both sides were popped out just like before. I have been in contact with Tiffin about causes and they act as if they have never heard of this problem before. They want me to bring my unit to Red Bay for an evaluation, 1554 miles from Tucson, “because I am out of warranty”, per their email.
Ryan, thanks for replying. I thought I added pictures, but I will attach here. I may be able to go by Red Bay in January on our return from South Carolina for the holidays. The system will not allow me to post pic’s being a new user.
Both back sides at the back cap are pulled out and bent up.
The version of Discourse running on this site does have restrictions for posting pictures for a time period on new users. I removed that on your account so you should be good going forward.
Thanks for the assist. I will try to attach the pictures here. The first set is the original damage, and the second set is after the repair and driving home.
I am in a Beacon so I have not experienced this issue but this is what is commonly referred to has “buckling” and is common in the Vilanos. Prior to 2021 Vanleigh was using 3inch and later a bit loner screw to hold the floor to the frame and that support was not enough. In 2021 they went to a 5 inch screw and that seemed to correct most of the ongoing buckling issues although I recently saw it on a 23 Vilano.
I recently saw the same symptoms on a Beacon but their issue was related to the broken structural welds.
Hopefully a Vilano owner that has done this repair jumps in but is pretty basic in adding more / longer screws to secure the floor to the unit. Reach out to Tiffin has they have a defined method for doing the repair which involves removing the belt trim, skirt and adding many more screws. I will post their instructions below but received this second hand so again please follow up with Tiffin as even outside of support they will give you the details to correct this.
If for some reason you had broken welds in the rear (unlikely) you would be able to examine that area during the repair.
Rear Skirt Buckling Resolution Instructions
Time Allotment: 3.00 Hours
Tools and Material Needed:
(14) 2” or 3” screws
(12) 1” Self-Tapping Screws
Impact Gun
Left Hand Skirt Panel (49” skirt metal Part # varies with model of RV)
Right Hand Skirt Panel (49” skirt metal Part # varies with model of RV)
(2) 1 ½” x 1 ½” x 2” steel angle with predrilled holes
Description of issue: This repair process if for rear skirt panels (Left hand and right hand) buckling near the rear end sidewall. Our goal is to install more fasteners to the area to strengthen up the area and eliminate any excessive movement that would cause the rear sidewall to move causing the skirt/s to buckle.
Repair Process:
Step 1) Remove belt trim above rear skirt and take screws out so the skirt will come off the RV
Step 2) Remove screw cover along the bottom of the rear sidewall
Step 3) Underneath the center of the rear sidewall and chassis, install (4 to 6) x 3” screws from the floor frame to the sidewall.
Step 4) Install (1) 2 “to 3” (screw length depends on out rigger location) screw from the outrigger in the chassis going to the rear sidewall on each side of the RV
Step 5) From the outside of the rear sidewall, install 4-6 x 3” screws in the rear sidewall going toward the chassis and floor frame
Step 6) Add steel angle with the 1” self-tapping screw to the chassis I-Beam and back wall of the RV.
Step 7) Install the new skirt panels and trim to complete the repair.
Ryan, Thanks for the info. I’ll send it along to Le Mesa RV Service here in Tucson to see what they think and maybe they will reach out to Tiffin for the full instructions. Maybe it will save me the 3000 mile round trip to Tish or Red Bay.
Jim
Thanks for the info. I replied on the forum also.
Jim
Ryan , I reached out to Tiffin for a tech copy of the procedure and was immediately told it was for tech use only and they would not share.
I figured that would be the case, but I tried.
Jim
Unfortunately they dismantled the dedicated Vanleigh support guys and now when you call you get the general call center who are answering the calls for all Tiffin products. Shawn Cole is an excellent resource and is the one that actually provided the directions I posted in the group but wanted to make sure you checked first to see if their procedure changed.
I shot Shawn an email and hopefully he is able to assist. Shawn was instrumental in supporting Vanleigh owners but has recently moved on to a different position at Tiffin. He still often assists owners.
I received a response from Shawn stating what you were told is correct.
He stated in part:
“I sent the instructions to compliance and they are making a document that we are able to release. As soon as I have that document I would share with you via email as well as our team will be able to release to customers and technicians.”
The procedure I posted was accurate but sounds like there will be a consumer friendly version to come.
Ryan, have you heard back from Shawn whether or not compliance has made the document for the buckling issue? Thanks for all your feedback, its really been a big help.
I have not heard back from him but it sounded like it may take a bit. The instructions they are making will be from the tech instructions I originally posted but a consumer version. If in your position I would work off those tech instructions as they are probably more detailed than the document that will be produced.
Thank you, I sent a copy to the service advisor at La Mesa Tucson. They are still waiting for the new panels to come in.
I really appreciate all you help.
Fore sure. When Shawn sends over the document I will also post it here just we all have it.
Is that the front frame flew that you’re referring to? Are they repairing them?
The issue that Subsonar is posting about is buckling in the rear of the unit where the walls are shifting on the floor and cause the skirting to buckle / wrinkle. This was fairly common on the Vilano units prior to 21 as Vanleigh used 3" screws to secure the wall to the floor however in 21 changed to a 5" screw. However there has been a few newer units with buckling.
The typical flex issue happens up front at the curve and usually on the side of the unit with a slide opening. Those issues always come with broken aluminum welds in the wall structure and sometimes steel wall supports on the frame broken.
Not sure if you have either issue; buckling or Flex but should be noted that Tiffin has been pretty exceptional at providing a “good will” correction for flex issues for those outside of warranty.
Got my 5th wheel back from La Mesa Service yesterday. They used the procedure that RyanB sent and found several of the fastening screws were either too short or not attached at all. They followed the procedure to the letter and so far we have had no problems. They also added two tie clamps to the rear of the unit between the rear wall and floor for more stability. Thanks to RyanB and Shawn for their assistance. Also, they did not charge me anything.
We have a 2020 Pinecrest and the same thing is happening! We are headed to Tishomingo next week to get it fixed!
We’re in talks with Tiffen and Lippert, depending on what Tiffen is offering you can buy a whole lot of gas for what these repairs cost retail!
We just got back from a Christmas trip to Charleston and it happened again even after the so called fix by La Mesa using the repair fixed supplied by Shawn. The rear panels popped out of the rear end same as before just not as severe. I have a feeling I’m going to have to make a trip to Tish for a better repair.


