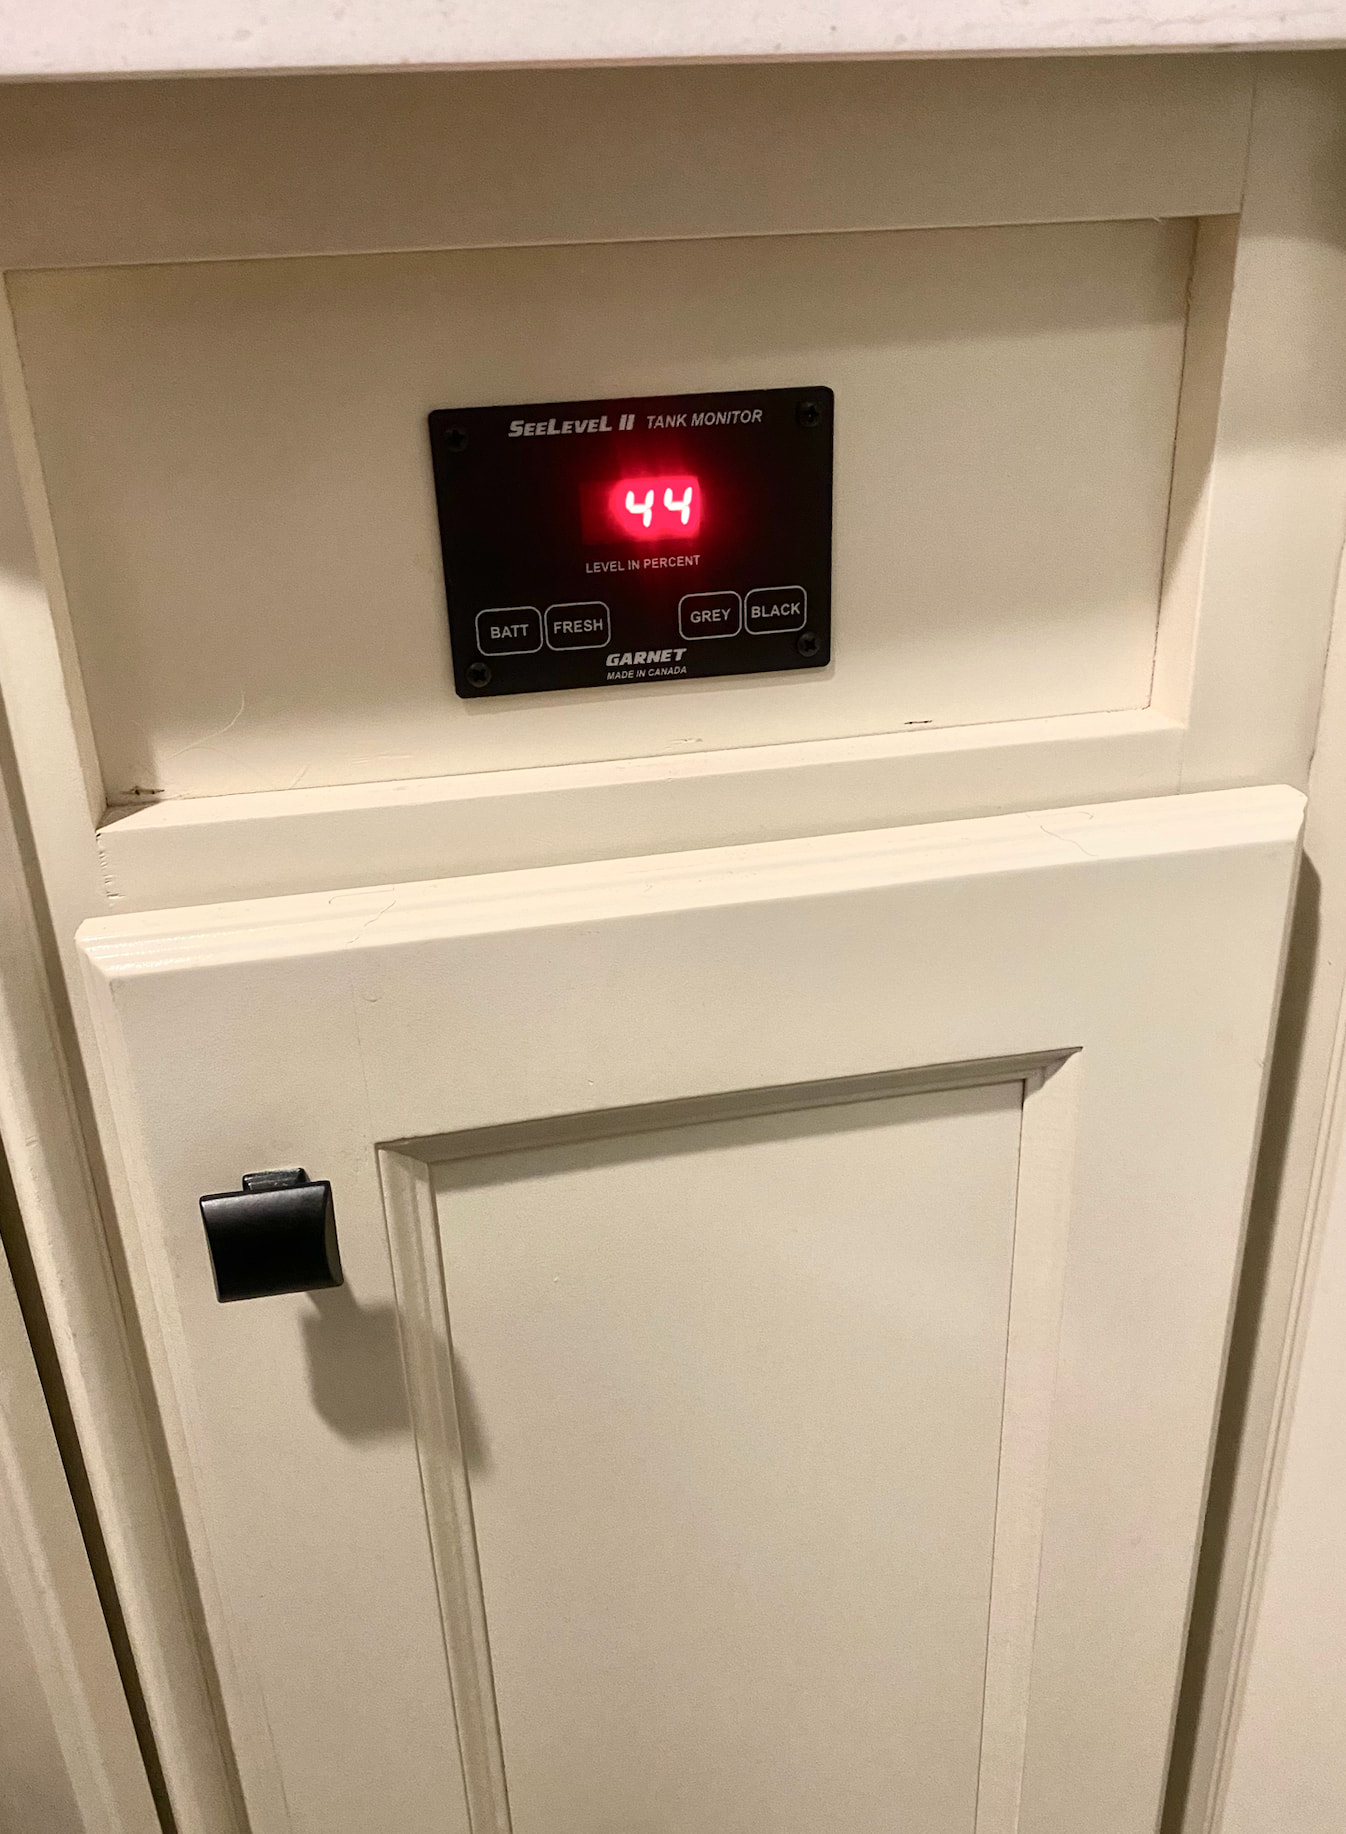
I’ve been wanting to add the See Level tanks sensors to our 39FBB for a while and finally found some time and good weather since we’re in AZ for the winter. I went with the RV-C version kit ( which includes the 709-RVC NLP display and three 9’“ 710-AR2 sensors) as I’d like to integrate the levels from the See Level into the Spyder display.
For those of you that have installed See Level sensors and integrated them into the Spyder display, could you provide some info regarding the connection used from the See Level display to the RSI-9 interface? Haven’t seen any detailed information and would like to get a better understanding of connecting the two.
Hey Stuart!
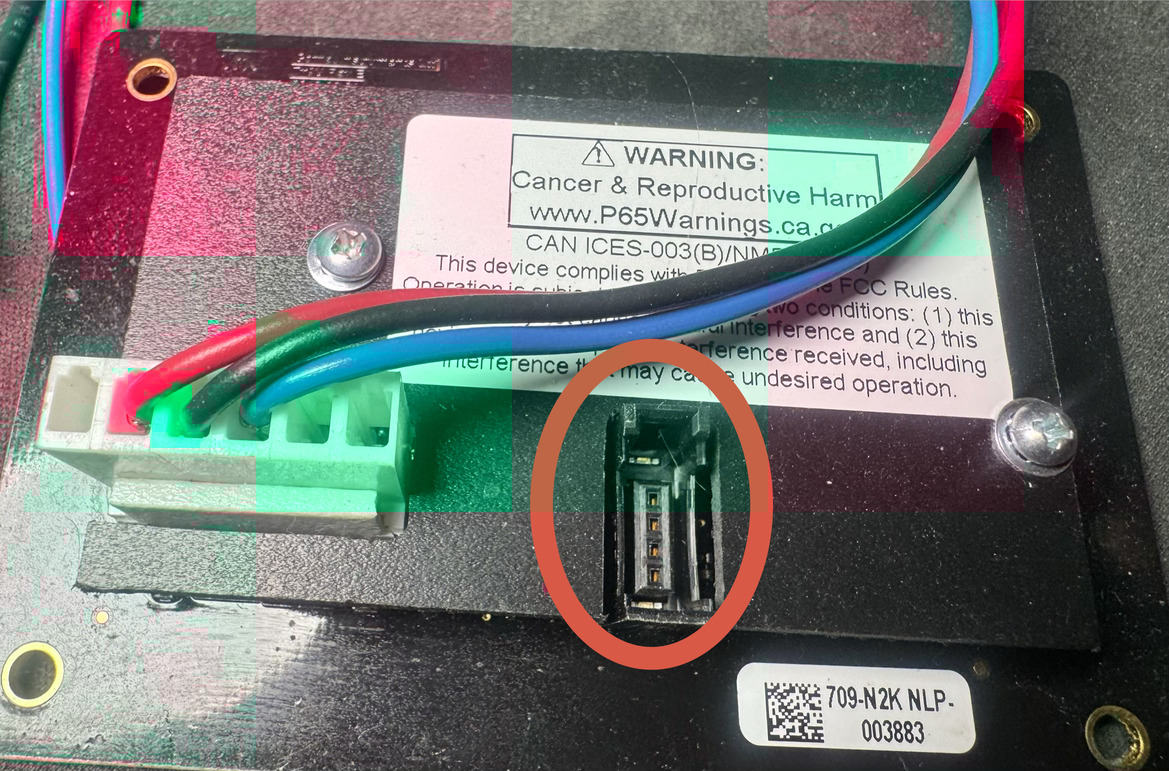
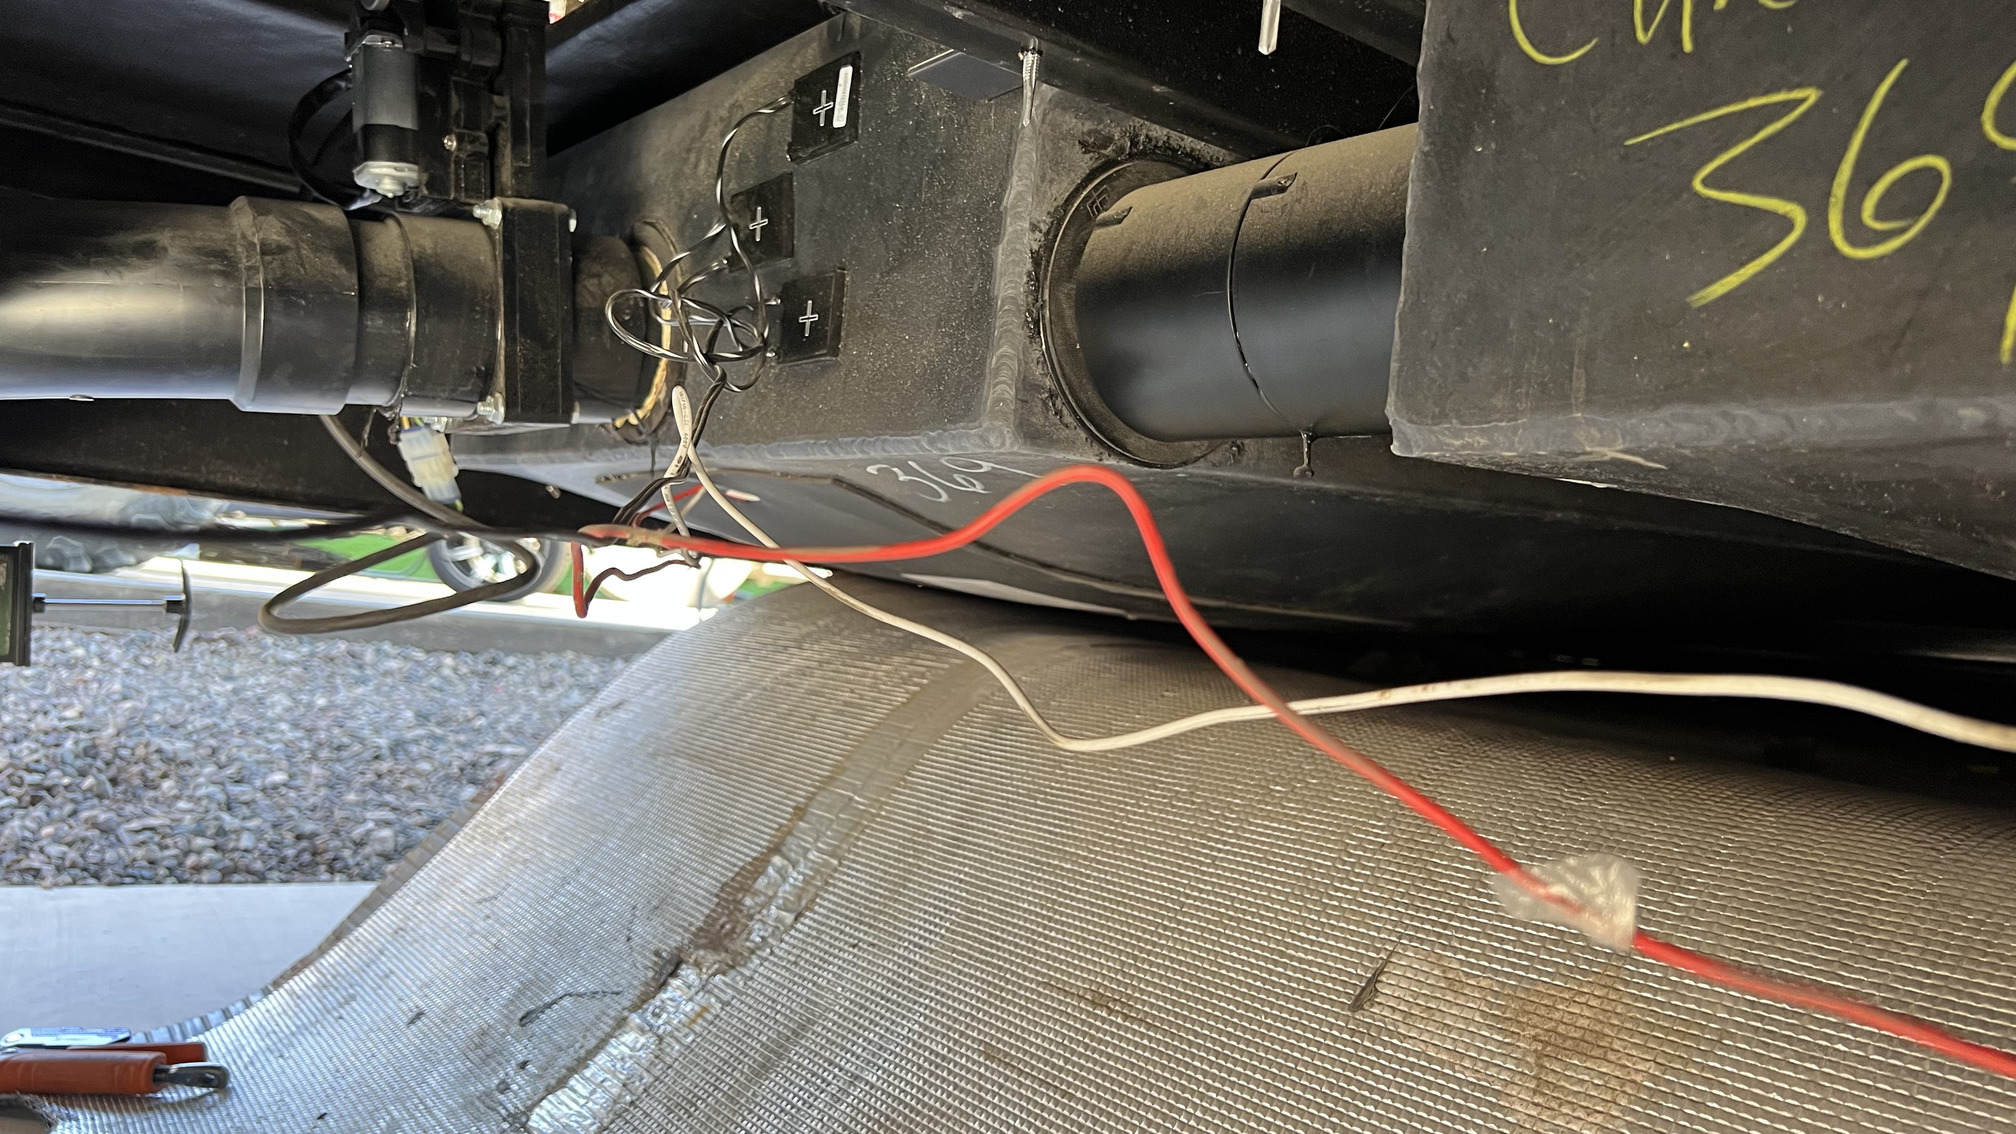
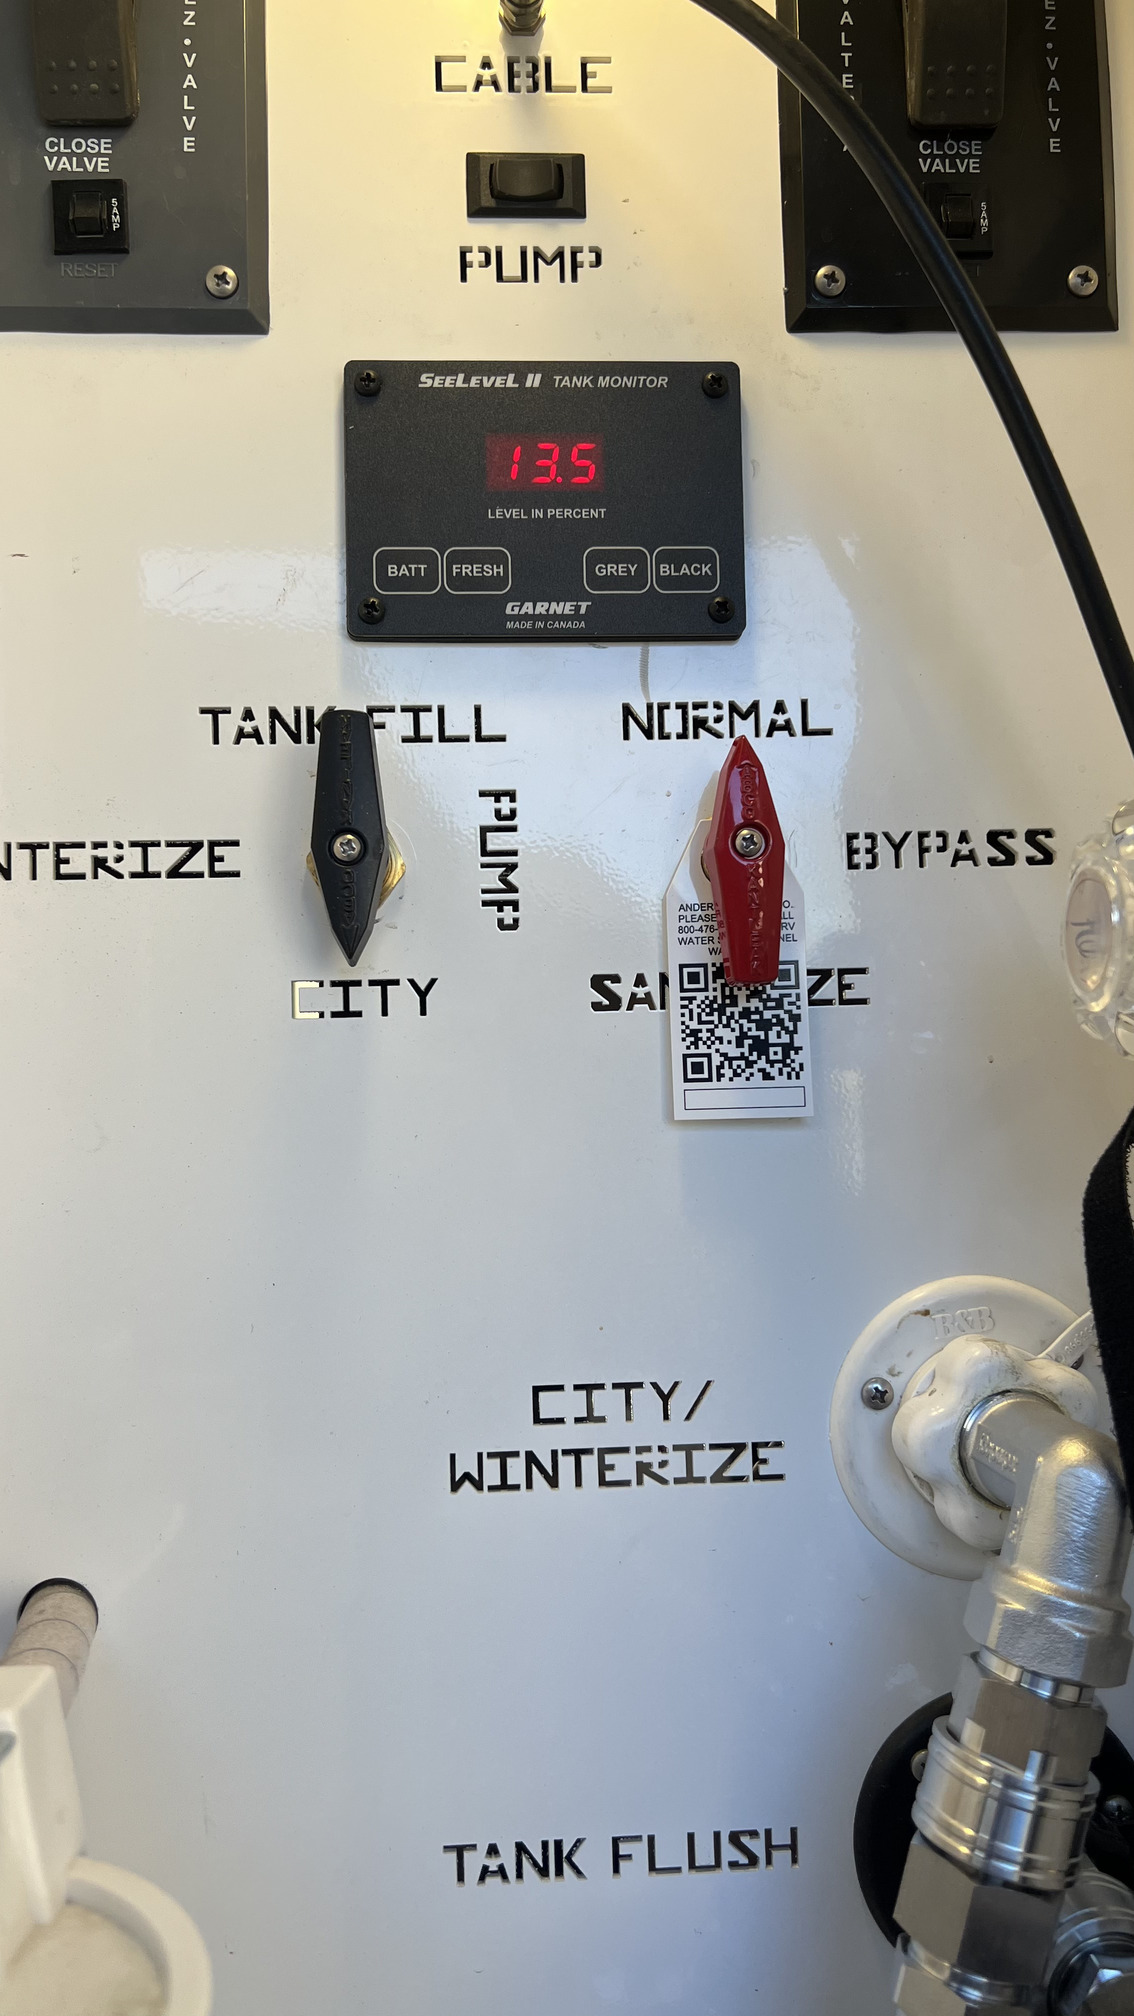
The back of that Seelevel display has a 4 pin net connector and the RSI-9 board has several open unused slots, the cable that connects is a 4 PIN RVC net cable. On my install I had my RVC display in my bathroom and dropped the cable down near the plumbing which was easy to route to the RSI-9 board to connect.
The cable is a four wire; CAN high, CAN low, ground and power terminated with a 4 pin clamp connector. I received the first cable I had free from Spyder as they had shipped me some other items.
I later needed another cable and bought the ends from an electronic store online and used some CAT6 cable I had laying around to make a cable. Spyder does sell the assembled cables, or if you feel like saving a few bucks just the stranded cable (I believe by the foot) and of course the 4 pin plugs.
Once connected the Seelevel readings will display on the Spyder screen however, without an update from Spyder the system will flash between the levels of the old sensors and your SeeLevel readings. This behavior actually isnt bad as it was always interesting to see the two different readings and can be used in this way going forward.
If you want the Spyder to only have the readings from the Seelevel system you will have to get an update from Spyder. They did this for free (as with other owners I know) just sending me a file to place on a USB drive to place on the system. I have since heard of another owner that was charged $50 but I think comes down to the tech you speak with at Spyder.
Thanks Ryan, that very helpful. I’ll be calling Spyder to also check on the update you mentioned.
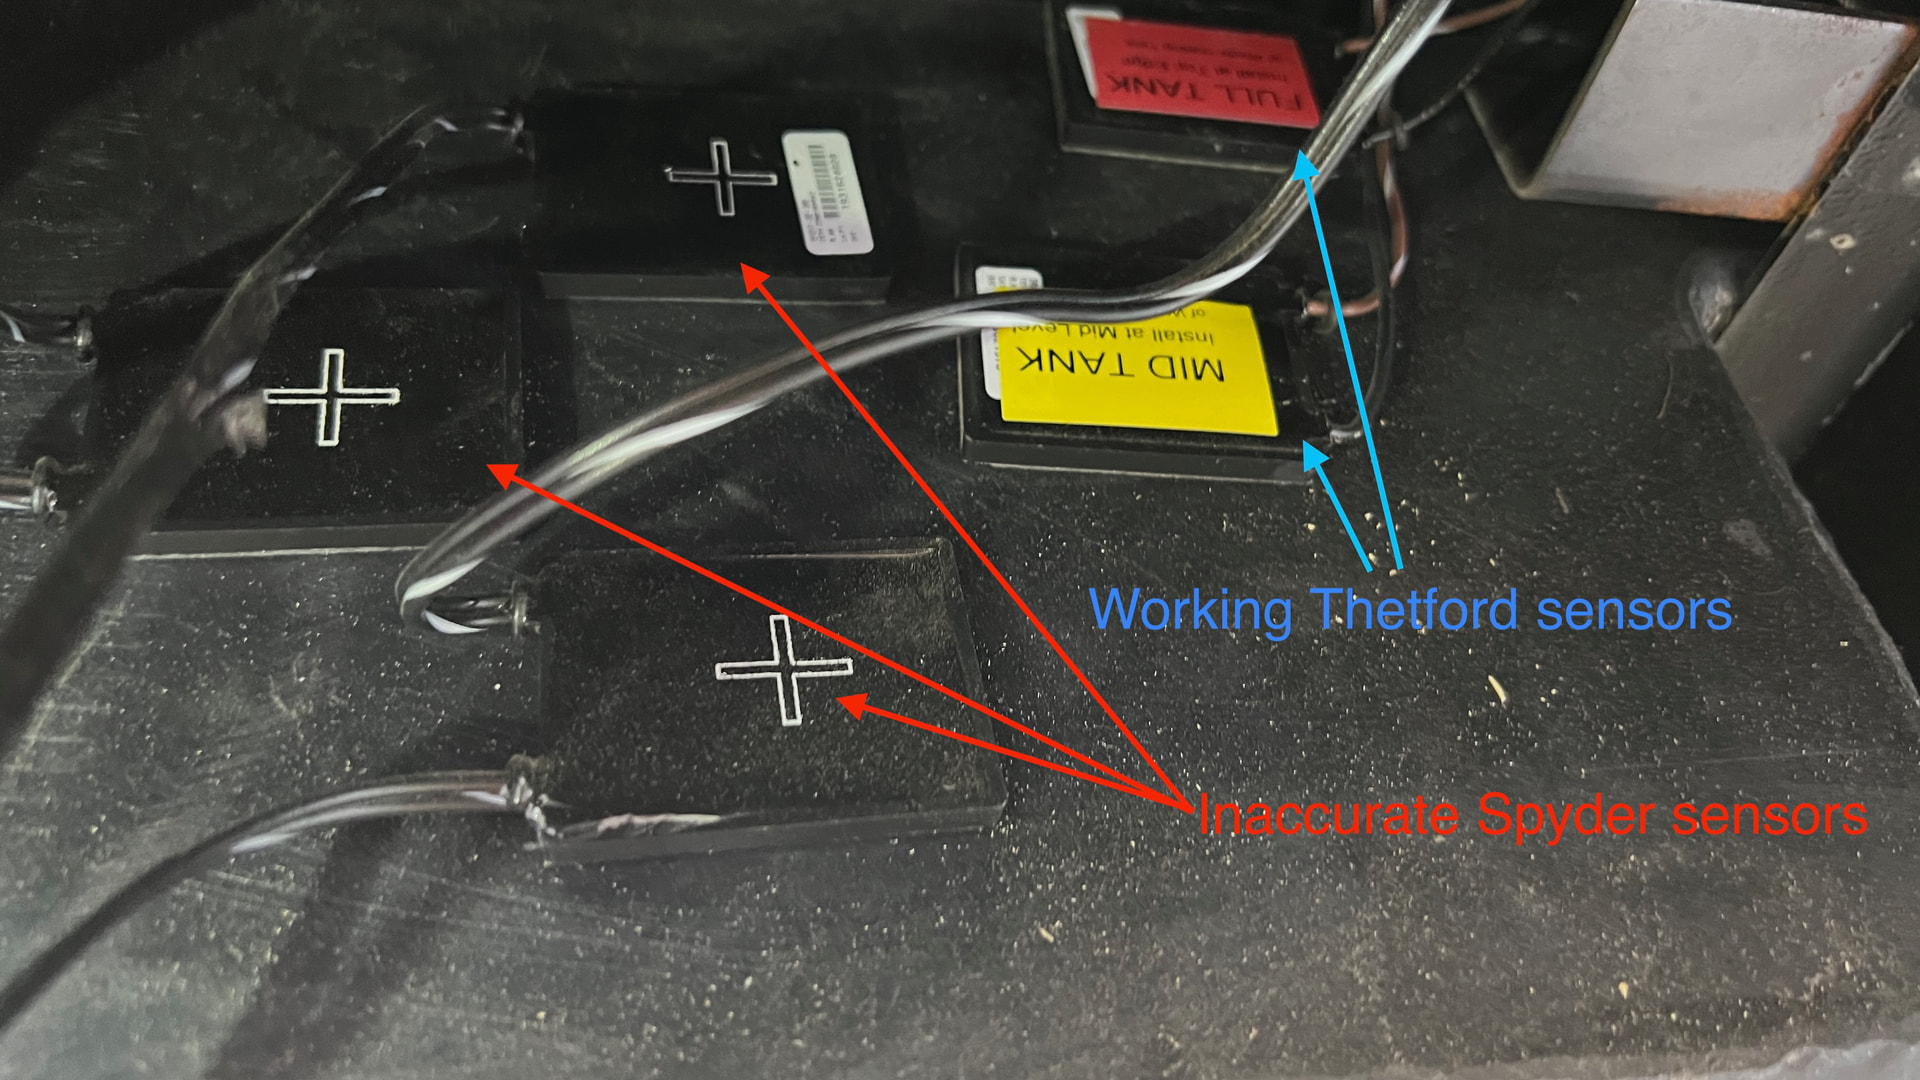
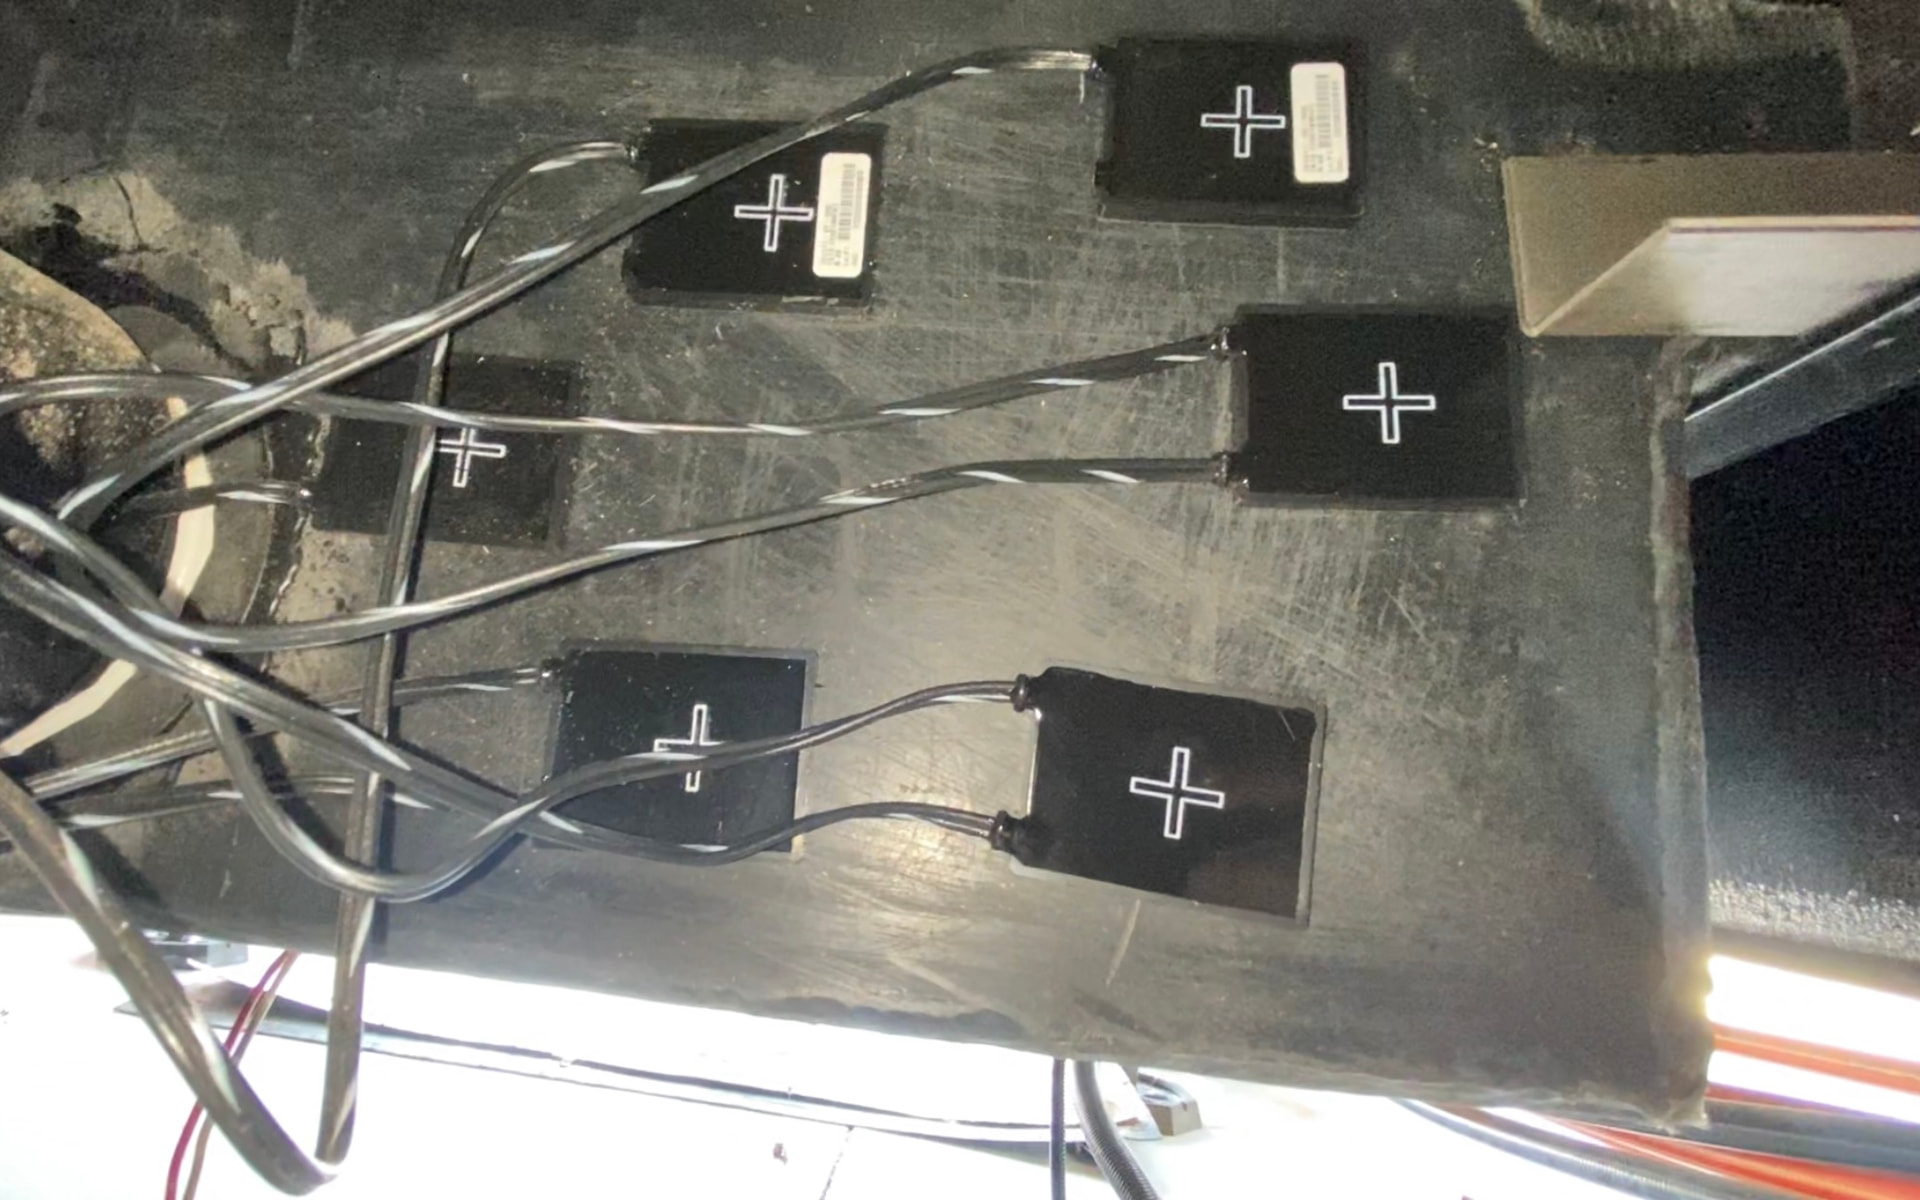
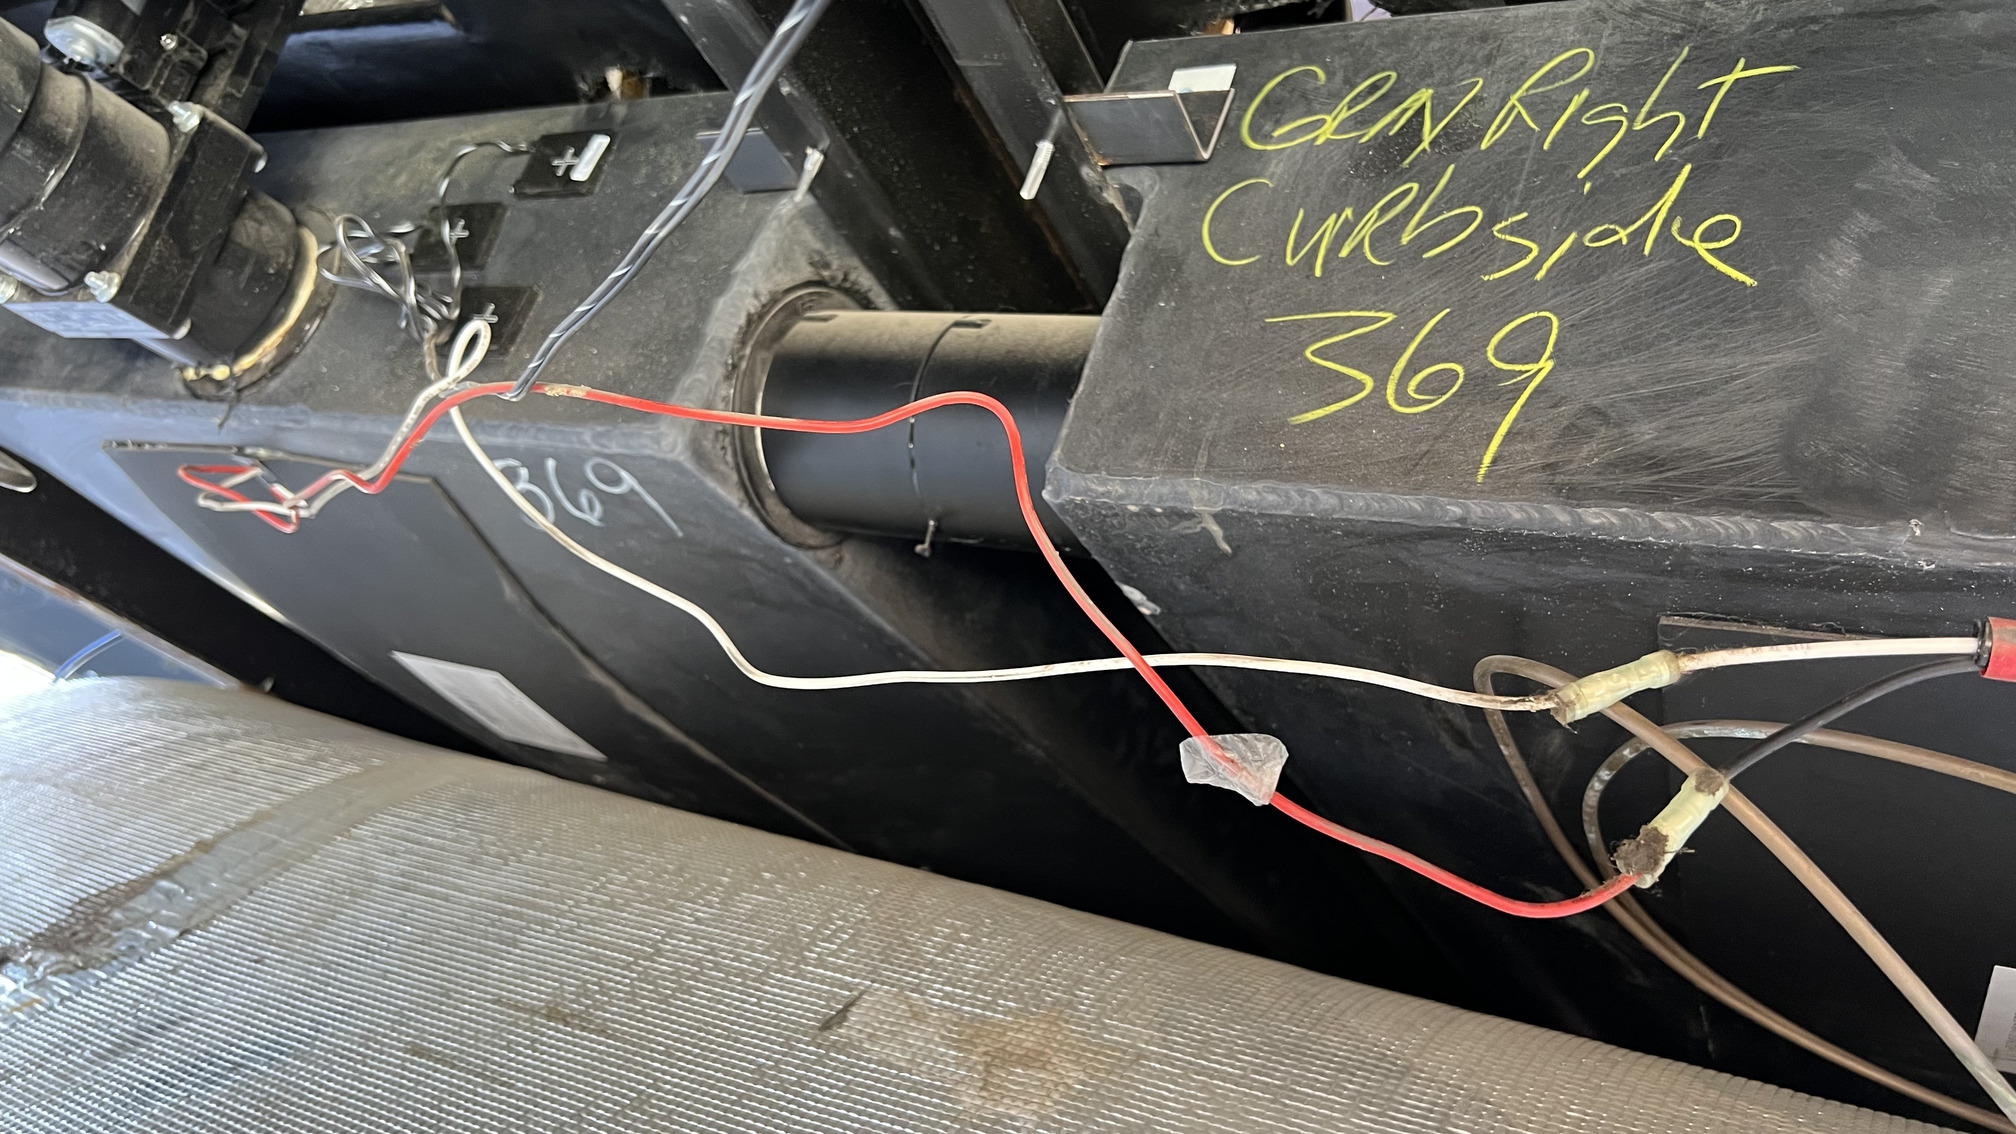
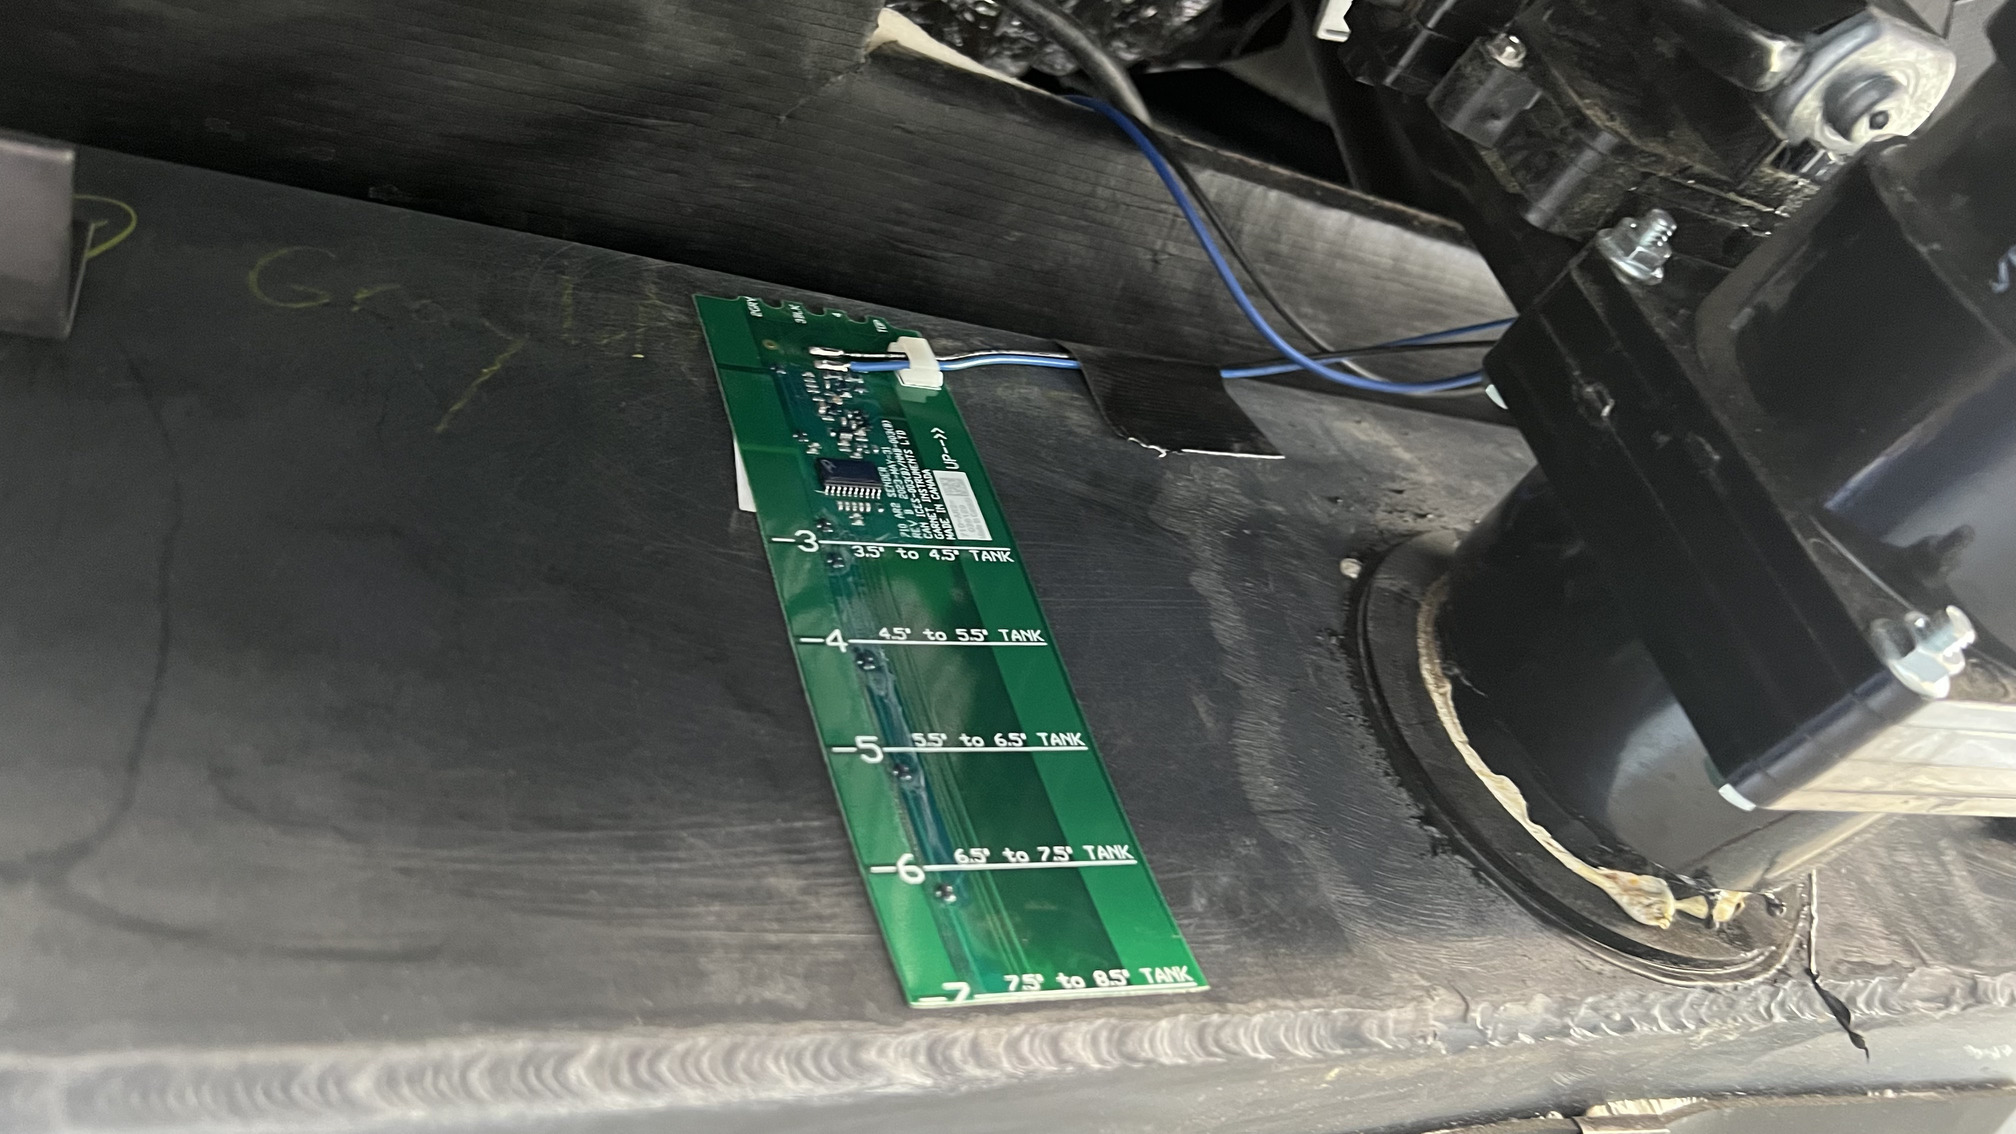
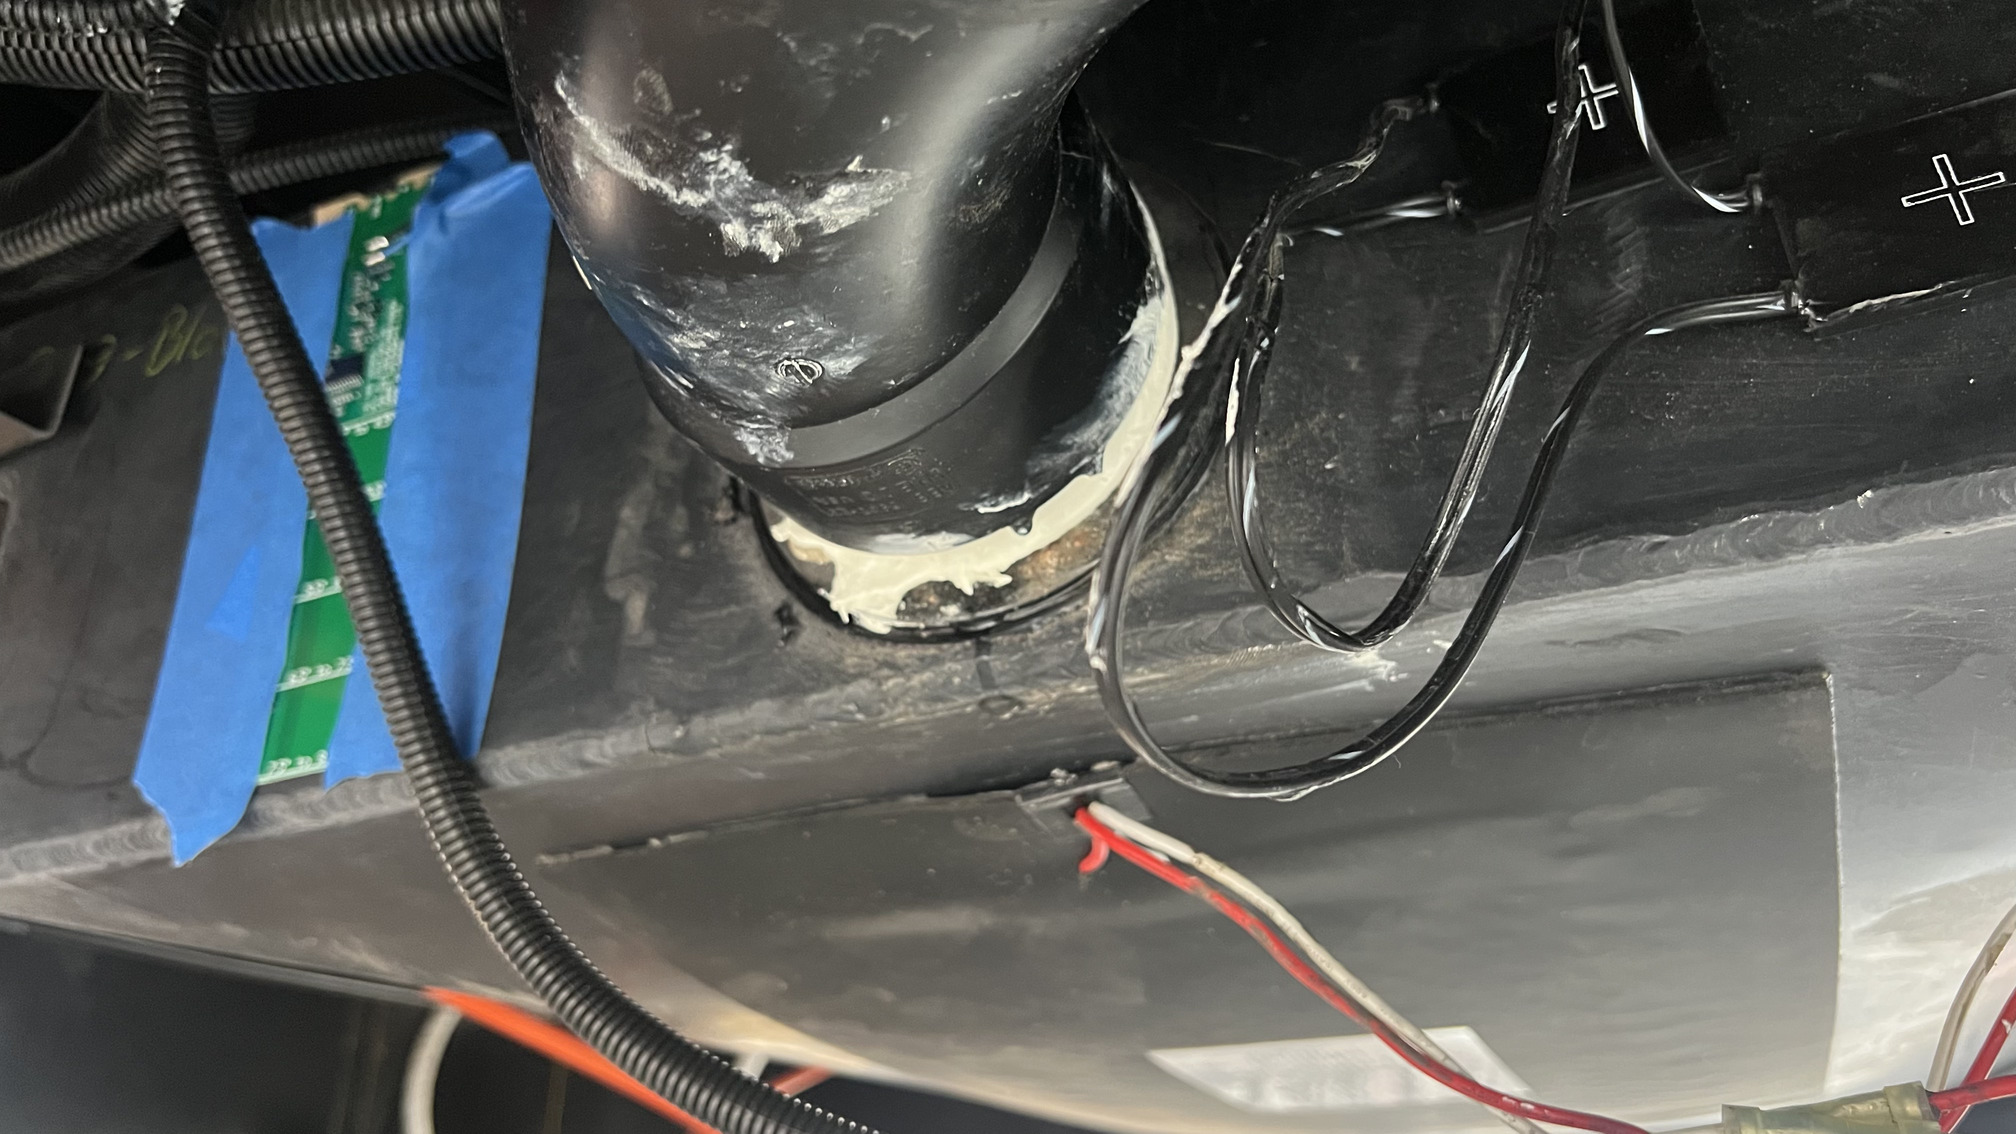
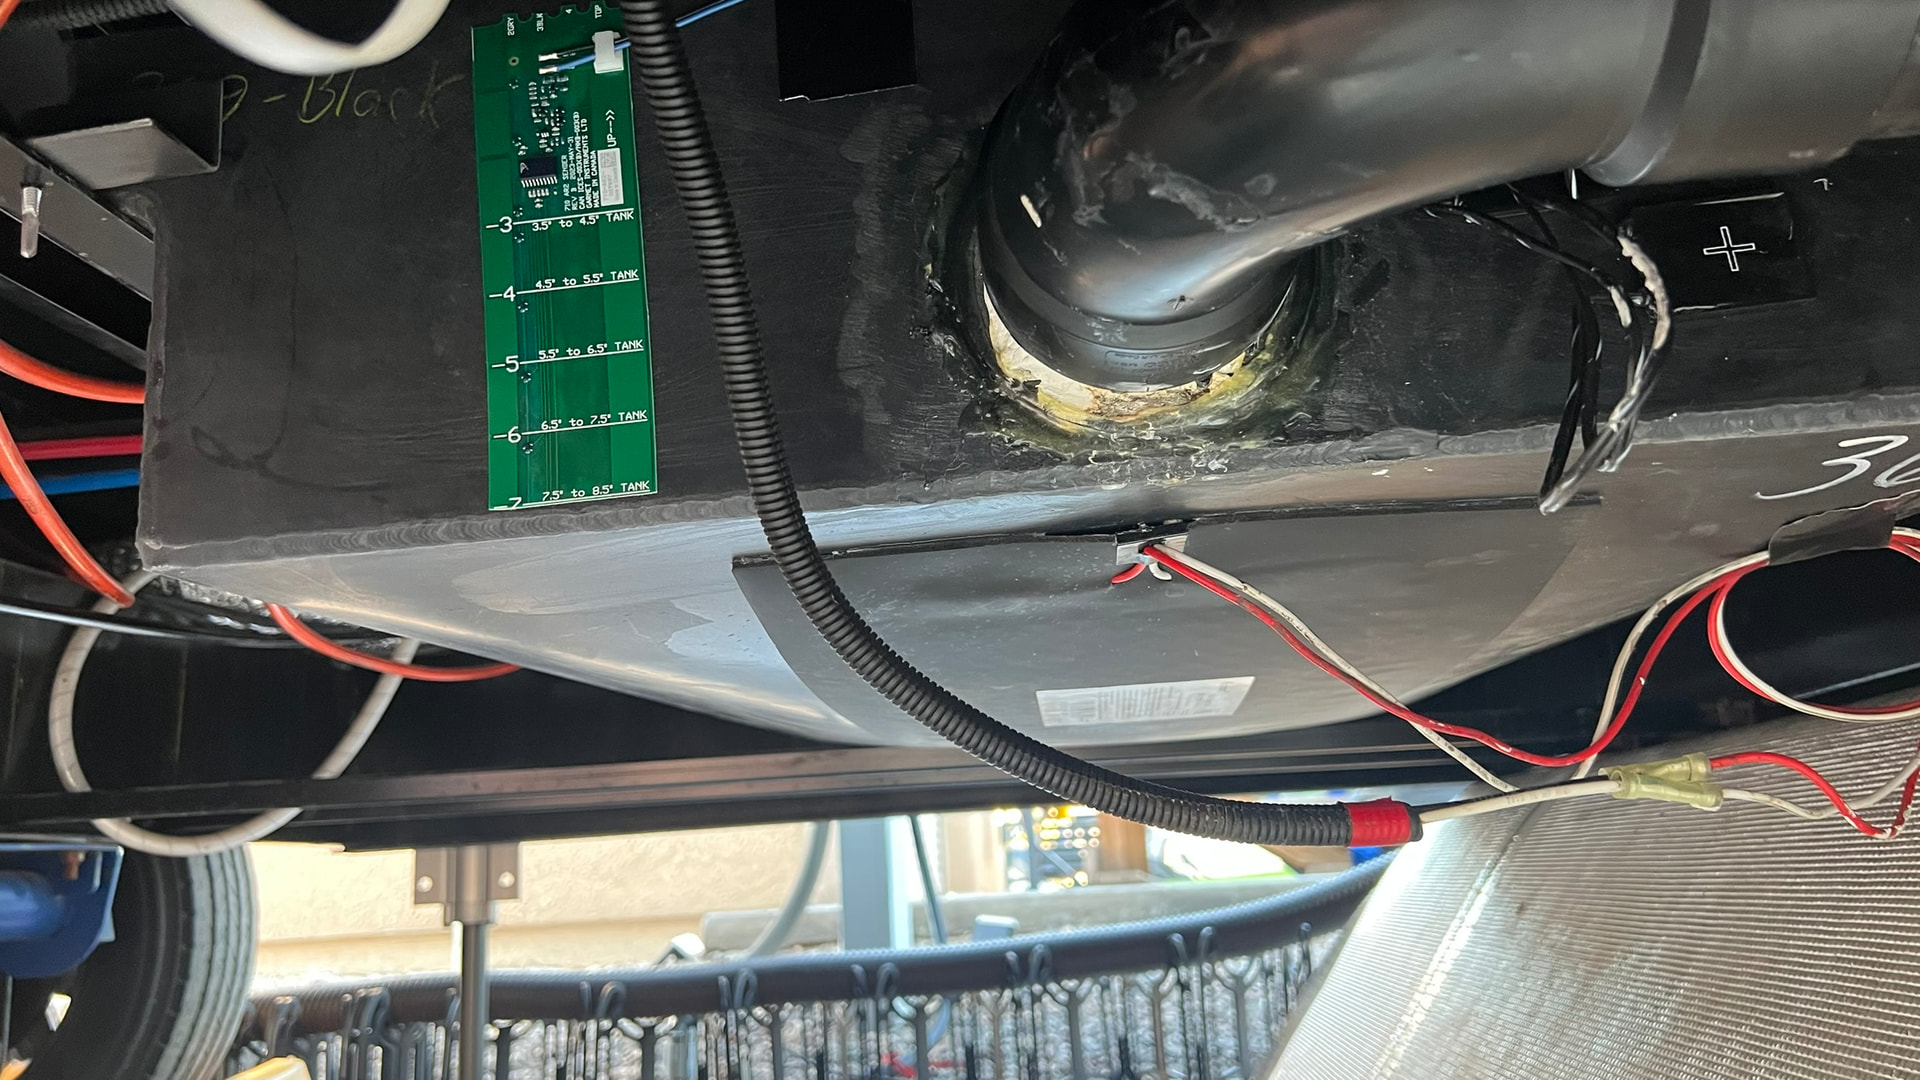
Still working on accessing the tanks by removing the coroplast which has turned into a multi day project. Those shot nails into the frame have gotten pretty rusty over the past few years and are a bear to remove. I have good access to the black and grey tanks now and just about the same for the fresh tank. I finally found out why our blank tank levels were not accurate and didn’t match the Thetford macerator toilet indicator. Seems like they were in a hurry when attaching the Spyder display sensors and stuck them all close together, but did get the Thetford sensors in the right spot.
One other question since you also have the Vega touch Eclipse module, did it come with the cable to connect it into the G6 panel net port? Just received mine and only got the module and thought they included the cable too.
Guess I’m cable/connection challenged this week lol.
Mine did come with the cable but I honestly cant remember if I paid for that or if it came with the module. I bought mine at the 2021 Vanleigh Rally in Hot Springs so it has been a bit. I do have an extra 10" cable I would be happy to throw in a USPS box if you want it. I may also have some extra ends but havent seen those floating around for a bit.
The close placement of those sensors for sure didn’t help with an accurate reading. You will be happy with the Seelevels. We wouldn’t boondock for the extended times with confidence like we do without them.
Thanks again for this info. I went back through my emails with Firefly support and found where they told me that the purchase of either a Mira or Eclipse comes with the RVC cable, so I’ll get back in touch with them on Monday.
I think I’ll also order another RVC cable for the See Level display from Firefly too. It’ll be interesting to see the differences on the display as you mentioned too.
I called Spyder and they insisted they don’t have anything related to Vanleigh units for the update to fix the levels from the Spyder & See Level alternating on the Spyder display. I asked for the rep to check to be sure and he found they do have support for Vanleigh models 2021+. I mentioned that the 2021 models have the same G6 and RSI9 as the 2020 models. They would sell me the upgrade for about $70-100, but I’ll hold off for now. I did get the RVC cable to connect the See Level to the RSI9 though.
I also ordered a 12” RVC cable from Firefly to connect the Eclipse module to the G6. Apparently they no longer include the RVC cable unless you purchase the whole kit which includes the Eclipse and two RVC cables and a drop tap.
I had to work with multiple engineers as they had told me when I inquired about the Seelevel readings that they had not developed anything for Vanleigh at that time. It did take some time for them to develop the package but they stated it would make it so future owners wouldnt have to go through what I did. You are correct in that you have the same hardware however GUID versions could be different.
They have been inconsistent with the charge. I have helped several get there Seelevels setup and only one of those folks had to pay. There most knowledgable tech was Gordan and used to be the primary person to answer the phone for support calls. Gordan retired a few years back - big loss for us customers but happy for Gordan. He helped me a lot with my systems.
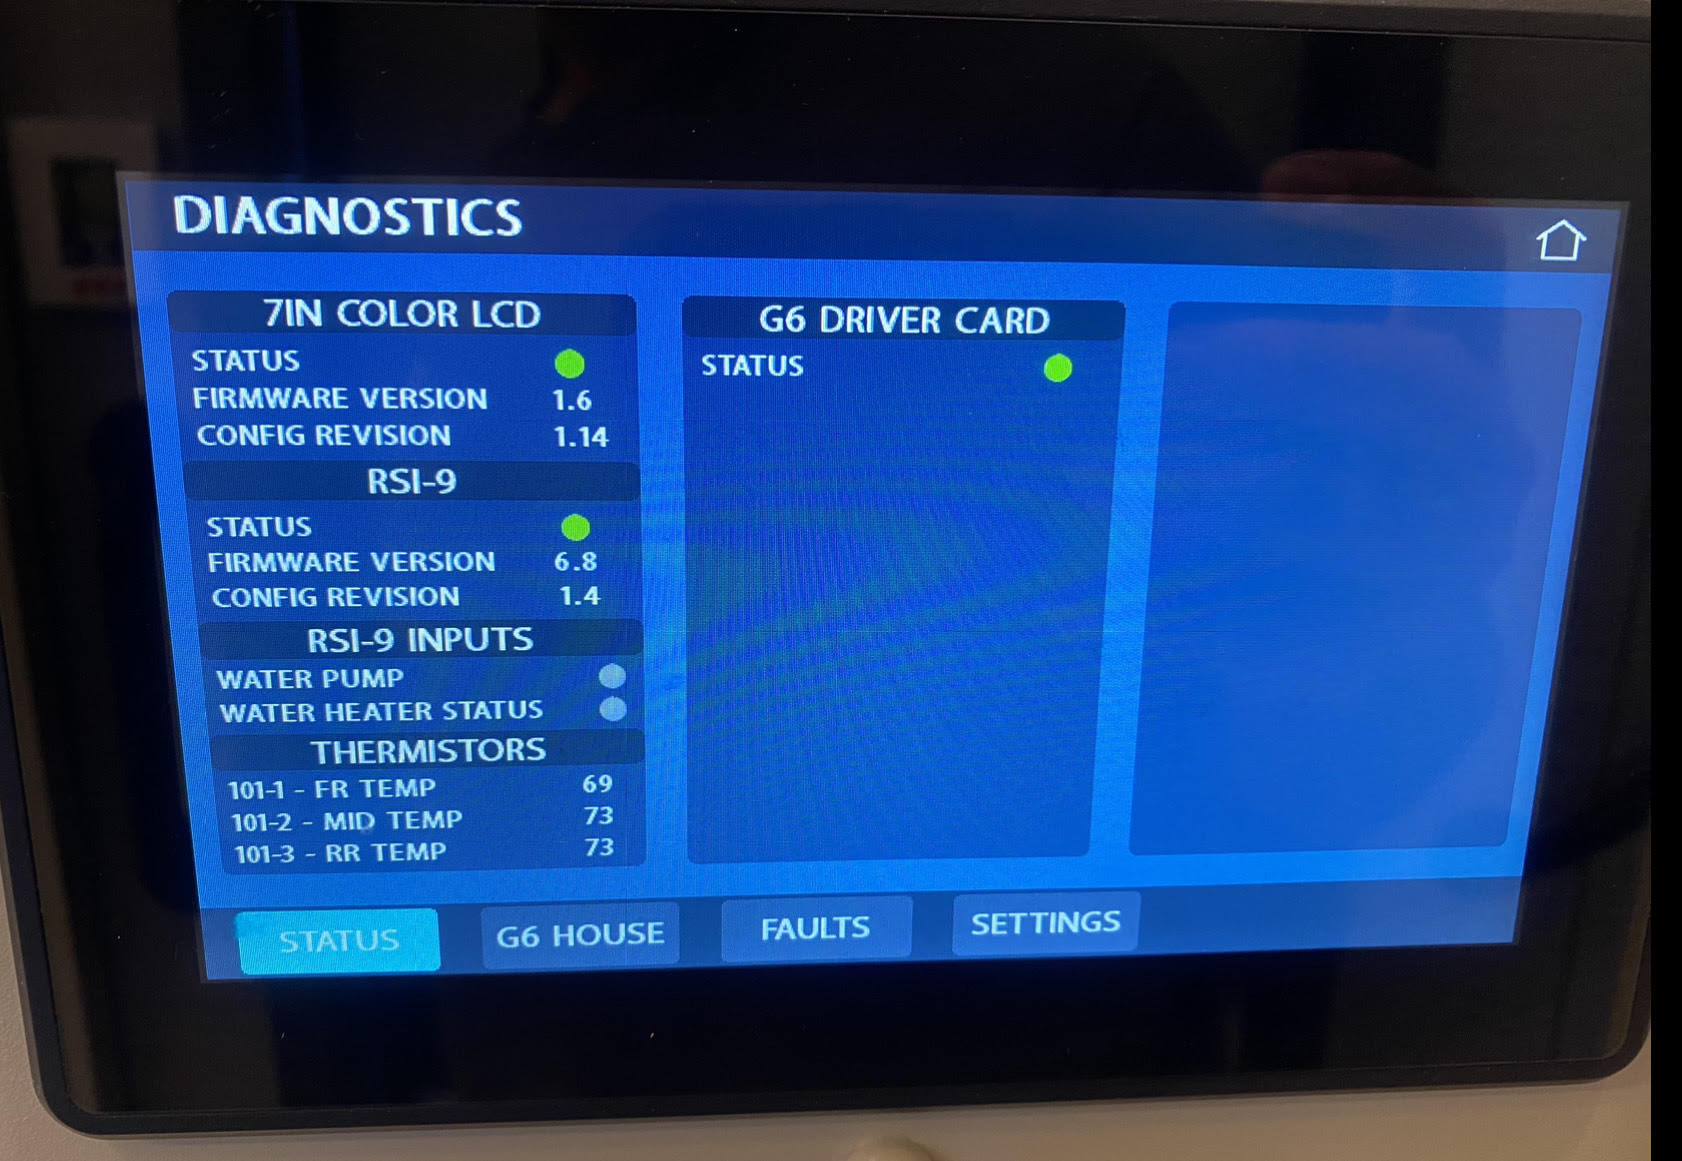
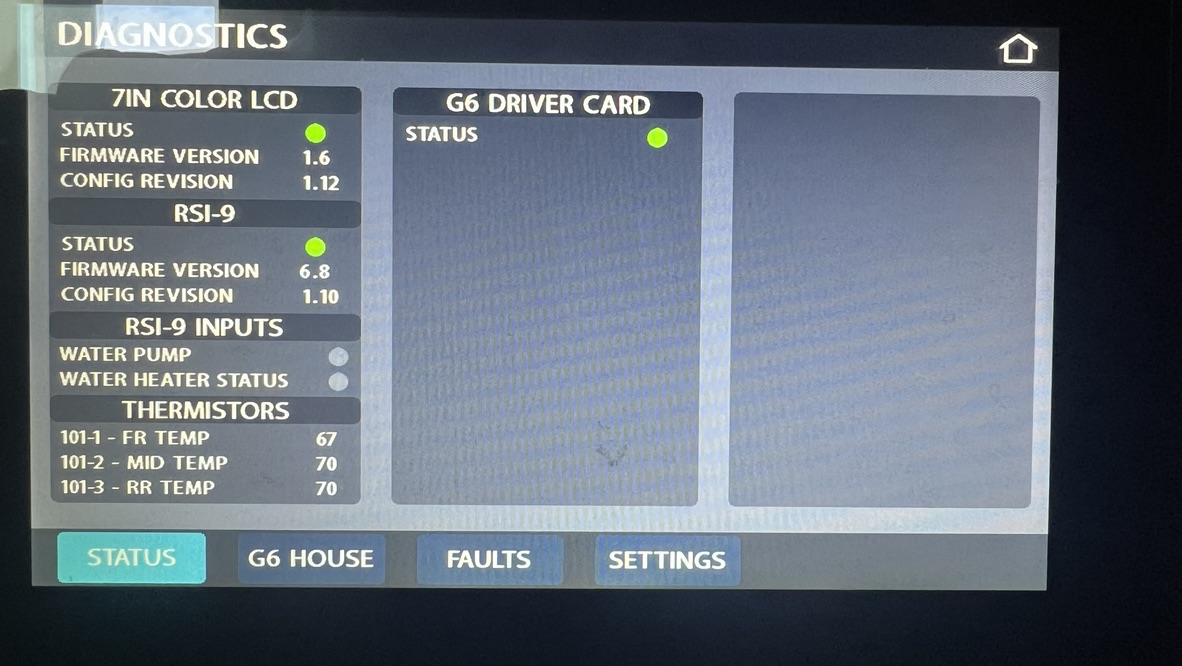
This was a screenshot of my system versions right prior to my Seelevel update. I would be curious to know if yours is different.
Hey guys, can the sensors be installed without removing the under belly for the black and gray tanks? I was wondering if they could be installed where the dump valves are located. Any ideas as to why the factory sensors are so bad? Loose connections, poorly stuck on? I don’t use my fresh water tank that often but my gray water tank has been stuck on full for the past 3 weeks and black stuck at 67% to full as well. I think a SeeLevel system is in my very near future. If I need to pull the underbelly, how do you get those nails out? Did you just run in some self tapping screws for replacement?
Hey Lynn, you do need to remove the underbelly - I attempted to see if I could use the valve holes in my basement but it just wasnt going to be a clean placement of the sensor. Probably not impossible but for sure difficult and when holding the Seelevel sensor with the sticky backing removed, that sensor would attach to anything as you tried to get down the hole and wouldnt apply to the tank cleanly. With that said though my hands of such size that when my gray valve actuator was broke I had to have my daughter place the zip tie for me.
The factory sensors are just low end for reading through the tank material and it doesnt help that they are often placed haphazardly or have even fallen off. I will attach a picture of my gray tank prior to changing over to Seelevels. I always kept my tanks extremely clean using a small pressure washer and a sewer jet kit to clean them out when we actually had hookups but didnt help a whole lot and for sure didnt give us the feedback we needed for extended boondocking stays. We primarily boondocked so knowing our levels in our tanks was critical for us on making the decision to move on to the dump station and Seelevel extended our stays.
By the time I installed mine I had my underbelly replaced by Tiffin a few times so I had all self tappers in. I used an air chisel on my first 5th wheel that just cut those nails and Tiffin used a similar on my Beacon. I have seen folks pry them out with all kinds of different approaches.
I have had a very good experience with my Seelevels and the cost for the components was minimal for the reward. I am guessing after Stuart’s install he will give us a full write up so when you are ready you will have a good guide to follow.
As Ryan mentioned the only way to get those See Level sensors installed properly is to remove the underbelly. I’m just finishing up my install and the removal of the underbelly was the worst part of the process and a huge PITA.
I watched many videos on the best way to remove the shot nails and found by removing the small plastic collar on the head of the nail you can try using a small socket to remove them while slightly pulling down. Sometimes that would work, but more often than not, I found better success by using the drill chuck to clamp onto the head of the nail and slowly run it in reverse by pulling down. That would remove the easy ones, for the ones that didn’t come out that way, that created enough of gap between the head of the nail and the I beam to use a pry bar to pry them out.
This video was helpful in removing those shot nails:
It was a time consuming process! I removed only about half of the rear cover and the half of the front cover to just gain access to the fresh water tank and the black and gray tanks.
I did try to take a few pics and I’ll upload them once I get them organized.
Thanks for the pictures, I might have to wait (if I can stand it) until I get back home where I have a few more tools to do this.
It looks like you use a quick connect on your water line, what kind is it? They look different then others I have seen, much better.
I use the Blu technology water filters and they come with the stainless steel quick connects. They are much heavier duty than the ones I’ve use in the past.
Just received the the RVC cable from Spyder and connected it up to the See Level display and the RSI-9 board. Everything worked as you described. Both Spyder and See Level alternate between each other. I did try a quick experiment to see if unplugging the tank sensor (102 on the RSI-9) would only display the See Level numbers. Unfortunately it did not, it just treated those as 0% and still alternated.
I’ll probably try again contacting Spyder to see if I get a more knowledgeable tech regarding the update.
Stuart - Great to hear you got them all setup and working. If you dont have any success on your next call I could message you the contact information of the tech that assisted me assuming he is still there.
I chased down the video of adding the config on my unit and figured I would share it so you can see how easy it was … once I received the files. I even sound a bit confused as it happened so quickly but was happy to see the levels populate.
As always You guys are great out there posting the photos and information for the community!!
Thanks for all the information. I have the see level kit but I have the skirting up around the bottom of Beacon and I am just lazy enough to tell my wife that I will get around to it one day. I have to go into the belly of the beast so often for a water leak that I can wait for another time to take on those nails.
Thanks folks
Ralph