Washing machine repairs

We ordered the washer and dryer option for our 2020 309FBB, thinking that was easier than to try and buy them and self install. They both work well given the smaller size, and we’re glad to have them.

For those that do have them I wanted relate a couple of issues we’ve encountered with them over the past few years in the hopes it may help if you come across similar issues.

The first thing I noticed was a leak at the drain pipe. We noticed this leak by seeing water dripping down under the front overhang. This leak was due to a faulty Hepvo valve. That type of valve is what’s used in place of a traditional p trap for space considerations. It has a flexible membrane that seals shut but still allows water to pass through when needed. In our situation, that membrane had somehow been flipped and wasn’t allowing water to pass through at rate that faster than the rate the washer was pumping the water in. That caused the water to overflow the drain pipe and eventually make it way out under the front overhang.

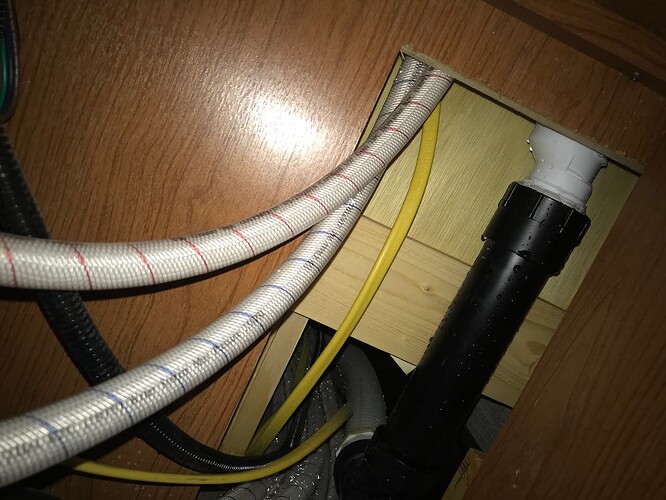
Water dripping down the drain pipe (Hepvo valve in white)

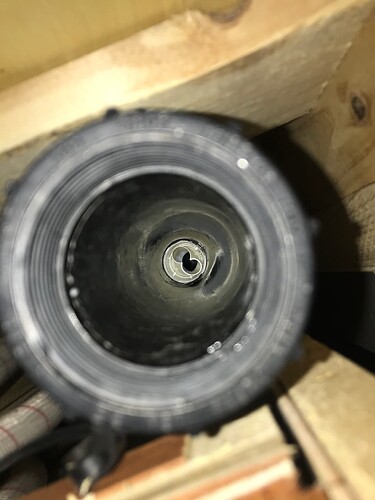
Membrane flipped

Since this occurred during the warranty period Vanleigh sent out a replacement Hepvo valve. Unfortunately whoever installed the original must’ve used glue on the threads as I couldn’t easily remove it without destroying the drain pipe. As an alternative I was able to get the membrane flipped back to the correct orientation using a long plastic pole, being careful not to tear the membrane. That solved the overflow and leak and I still have a spare for future use if needed. :slight_smile:

The next problem was the washer stopped draining. You can access the pump clean out behind the bottom front cover. Have a lot of towels and a bucket ready since all that water will drain out onto the floor otherwise. I checked to make sure the pump wasn’t being impeded or jammed up with anything. Turned out to be the drain pump being faulty. I called Splendide and they sent a replacement under warranty. All I had to do was install it.

The installation required access to the bottom of the washer which meant I had to remove both the dryer and the washer from the cabinet. That was the hardest part as they’re awkward to extract from the cabinet and took a two of us to remove them. Once removed it was a pretty easy process to take out the old and put the new one in. I tested it a few times before putting the washer and dryer back since that was going to be a challenge like removing them was.

The last issue I had was probably somewhat self inflicted. This involved another leak and took some time to track down the source. I notice some water dripping from the front overhang again and checked to make sure the drain pipe wasn’t clogged like before. The drain pipe was clear and I was able to see a little behind the washer and saw a pool of water on the floor that looked to be coming from where the hot and cold lines connect. I had to remove just the dryer this time to gain more access to where those water connect. Not as bad as the last time, but still a bit of work. With the dryer removed, I had good access to remove the exterior panels of the washer and could see where the leak was originating.

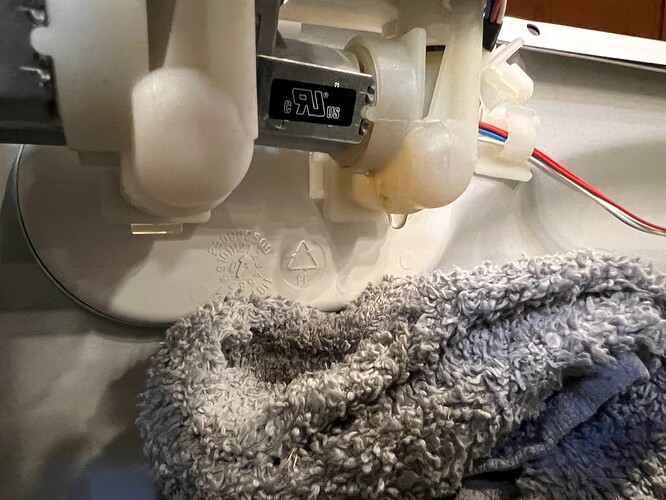
Leaking hot water valve

Apparently I hadn’t been thorough in the winterizing process and there was some residual water in the hot water valve which then froze and expanded the valve causing it to begin leaking. Another call to Splendide and I was able to order replacements for both the hot and cold water valves. I think it was less than $50 for both. I only needed to replace the hot water valve, keeping the cold valve as a spare. Replacement was very easy it’s gettin access is the challenging part!

I’m now more diligent and thorough when winterizing paying special attention to the washing machine, refrigerator ice maker and dishwasher. I’ll open the low point drains and run all the remaining water through, then use compressed air to blow out the system and finish with a few gallons of the RV antifreeze. Being sure to cycle the washer using both hot and cold cycles.

Hopefully some folks will find this information useful and be able to perform similar repairs if needed saving a lot of $$ and time. I think if I had relied on a dealership to perform these simple repairs it would’ve cost substantially more money and probably many weeks if not months before they returned the unit.
3 Likes

Excellent info Stuart.

In our home I had a bi-annual schedule of a deep clean on both our washer and dryer. I have kids and a couple of pups that seemed to provide some additional build up. I have not tackled that project on our rig yet due to the confined space and luckily no leaks in the area yet.

We haven’t winterized but just learned something through this post - I likely would have failed to run both hot and cold cycles on the washer. I do appreciate learning from others!

Thanks for the heads-up on the washer and dryer. I’m going have the pleasure of installing my w&d. Some things to keep in mind when I do it.
Thank you Stuart!

One additional thing I forgot to mention is how Vanleigh installed the washer and dryer in the cabinet. They are stacked together with the dryer on top obviously. :wink:

They opted to to secure them together using couple of metal plates on each side screwed to both the washer and dryer, essentially making them one unit. Since they were installed in a closet/cabinet, you can’t access those metal plates so I had to remove both as one unit. This made things even more challenging as there was very little room to try to tilt and lift them as one unit.

Before reinstalling them I found that Splendide offers a stacking kit that locks the units together but still allows you remove the dryer from the top leaving the washer in place. Details on their site here →

I purchased the kit for about $60 at Amazon.com. Was pretty easy to install and made installing them a lot easier and having done this a few times now I’d highly advise getting this kit if you’re going to be installing them in a stacked configuration or if you ever have to remove the factory installed washer and dryer add this before putting them back. Your back will thank you! :laughing:

Wow you have given me nightmare. I thought it would be hard to remove to service them and you have proven that!

Question, is the outlet for both washer & dryer on a gfi outlet? The outlet one my cabinet is on the bedroom closet wall. I can reach around the hole in the closet after removing the cover over the water valves. I had to plug in the power cords blind while my wife looked in from the half bath closet.

I bought a 1.5 gallon wet/dry vacuum at Walmart & with a towel tucked under the washer & vacuum on I slowly opened the clean out plug. It worked well with little mess.

Question, did you have to remove the toilet in the half bath to remove the dryer & washer?

Man it would be great to hire 2 jockeys to help out?

My wife loves the washer dryer from Splendide.

It certainly was an adventure removing them. Something I didn’t want to do, but really needed to so we could actually use them without leaks everywhere.

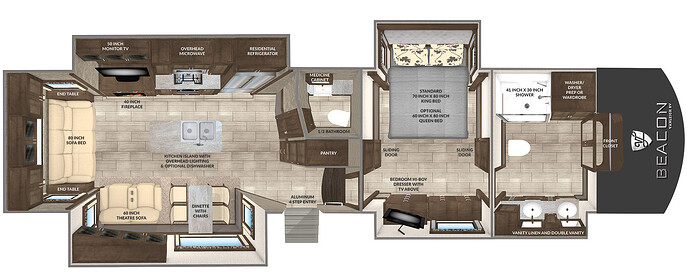
In our floor plan (39FBB) the washer & dryer are in the front master bathroom which is pretty spacious compared to our half bath by the living room. The extra room outside of that cabinet made it a bit easier as I could separate both units and still have room to work on the washer without having to take them outside. Sounds like your floor plan had the washer & dryer in the half bath would be even worse IMO! Removing the toilet might be an option to give yourself more room. Hopefully the layout on yours provides a bit more space in the half bath.

The power outlet is on the side of the cabinet that is next to the front closet near the water shutoff connections. Being able to remove them separately now, it makes plugging them in pretty easy, since I only need to unplug the dryer if I need to access the washer.

From my research and testing with a volt meter, Vanleigh put in two GFCI outlets, one in the kitchen island handling all of the outlets in the living/kitchen area and one in the half bath handling the outlets in bedroom and master bath. I had to replace the half bath GFCI when it went bad, it knocked out all of the front outlets. You could probably test in a similar manner, by tripping one of the GFCI outlets and seeing which outlets don’t have power. It should also indicate on the breaker panel legend which circuits are GFCI controlled.

My wife loves them as well. I certainly makes running a quick load a lot more convenient and easy.

I found only 2 GFI outlets. 1 in front basement controls outside TV & outlet under dining room table. The other is in island & controls everything from there to back bedroom & back bathroom!

I can’t tell if the washer & dryer in the 1/2 bath have their own GFI because you can only get an arm thinner than mine between the stacked units & plugin!

I’m betting the washer & dryer outlet is not a GFCI outlet as that would be a stupid place to put one. (Although you never know what manufacturers will do :wink: )

A couple possible options to confirm the outlet type I would try. Using your phones camera to see if you can get a photo or video of the outlet. You might be able to squeeze in enough to capture the outlet. Just be sure not to drop the phone LOL. If that proves impossible, using a selfie stick pole could do the the trick.

If you have a borescope you could use that to snake the camera cable in to view the outlet. I purchased this one off Amazon: Depstech borescope for about $50. It can be very useful for getting a view into tight spaces including plumbing drains

I was working around my washer this week and thought of this post. I was pretty sure my outlets on the washer / dryer were not GFCI and on our model it was easy to verify as the outlet is located in the closet. Wondering if @TajMyHaul got to the bottom of it.

Stuart - I had seen how the washer and dryers were mounted during a plant tour but goodness there wasn’t much thought into future service once the walls were up. I have a hard time getting to my clean out on the washer and in speaking with Danny he stated that they commonly re-work that area in our models pulling everything out and placing a small platform on the bottom. Next time I work on the washer / dryer I am all over the link you posted. Thanks for the info.

Ryan - You’re welcome. Our floor plan has a raised shelf already that the units sit on (there’s a heat duct directly under that shelf). That certainly helps when it comes time to clean out the washer, but it still can be a bit messy.

To anyone removing the stacked washer and dryer in these units, I’d highly suggest getting the stacking kit I mentioned earlier in the thread and install before putting them back. That makes removal immensely easier as you can remove the “lightweight” dryer without needing lots of people.

Another tip would be to slide the units off to the side opposite the electrical outlet so that you can squeeze an arm in to plug and unplug the units easier if needed. I did that and can now access that outlet.

Ryan I’m waiting for Amazon to deliver the scope Stuart recommended. I’ll post my discoveries after I get to play with it!