Our Beacon 39FBB has 3 A/C units. After I tested the compressors on the rear and mid units, looks like 2 of them have now failed.I’ve ordered replacements, same Coleman Mach 15K units it came installed with.
Since Vanleigh went with a ducted system and didn’t use the interior/lower distribution box, which is where you’d normally access the hold down bolts for the roof unit, I was wondering if anyone has any information on how the roof units are secured. It wasn’t obvious how the roof units are attached when I was troubleshooting them.
On the old forum, I recall one owner having replaced an A/C and had documented their process pretty well and had a number of pictures too. Unfortunately that information is gone and I wish I’d saved that post somehow.
Sorry Stuart I was up on roof 2 weeks ago servicing my Furrion AC units and did not look very closely. I do recall the attaching bolts were pretty well exposed once you removed the shroud.
Thanks Bob. I had the shrouds off both units I’ll be replacing testing the components, but didn’t look too close to see how they were secured to the roof.
The replacements are due to arrive in the next couple of days, so I guess I know what my weekend plans are LOL.
I’ll post up some pics of the process once completed in case they’ll be helpful to anyone else undertaking this adventure.
We have a 2019 a 2019 Vilano 370GB and when I had the center AC unit replaced at the 2 year mark, everything was done from the roof. I wish the units were fixable instead of just replaceable since a new compressor was only about $300 at the time (available on line) but the factory unit is sealed so an AC tech would have to solder in the new connections and ports to charge the system.
Best of luck on the replacement, the hard part is getting the old unit off the roof and the new unit up onto the roof - be careful.
Thanks Steamboat- I agree it’d be much easier to just replace the bad components as well for a lot less $$! I’d much rather be swapping out a pair of compressors for around $600 than two whole units at $3000. We seem to have transitioned to a throw away society rather than a repair one.
I think you’re right on with the challenge of getting the old ones down and new ones up. I’m hoping to bribe my neighbor with a few cold ones since he has a big tractor that should be able to lift the new ones up and take the old ones down. Will probably need quite a few of those s too after the jobs done, as they’re calling for temps at or near 100 this weekend here in Colorado.
Hey Stuart, I hope you have good luck with the AC unit replacement. I know you are very good at taking photos of the project and posting them for us here on the forum. I have been wondering how the units are mounted and then what is the replacement going to be like!!! Tell the neighbor thanks from all of us too! Anyway be careful and safe up there!
Thanks
Ralph
Depending on the unit installed, Coleman-Mach has installation instructions for their “Top-Down Mounting Kit”. For the 47000 Series that came installed on my unit the installation instructions 47233-1051 shows 4 fasteners holding it in place.
You can go to their website Coleman-Mach.com under support tab at top it will open a new window you can select literature and technical documents on the left side…from there you can download documents that support your installation or there is a search option in upper right.
I find these documents to be valuable in giving a picture of what to expect.
If you need help getting what you need, let me know and I will try to help.
Thanks @ERamsey ! I had looked on their website for technical documents, but I somehow missed the one you referenced. I think I was limiting my search to my model number unit (47204B879) and that search didn’t return any useful results.
Using your information I was able to get that top down mounting instruction kit document. Here’s the direct link in case anyone else might want it for reference Coleman-Mach Top Down Mounting Kit .
Hi Spud- You’re right about the capacitors and that was one of my first thoughts as they’re fairly cheap and easy to replace. I replaced them on both units and it didn’t have any effect on the problem.
On the middle A/C I had a MicroAir easy start connected and tested with the new capacitors and without the easy start installed. In both cases the compressor failed to start.
I found some good information from this RV Tech, My RV Works. he has some videos on troubleshooting A/C units and found this one
Following those steps I was able to determine the compressors were bad. From what I’ve heard the cost to replace the compressor is close to a new A/C unit (as well as special tools and knowledge replacing the system refrigerant), so I opted for new units.
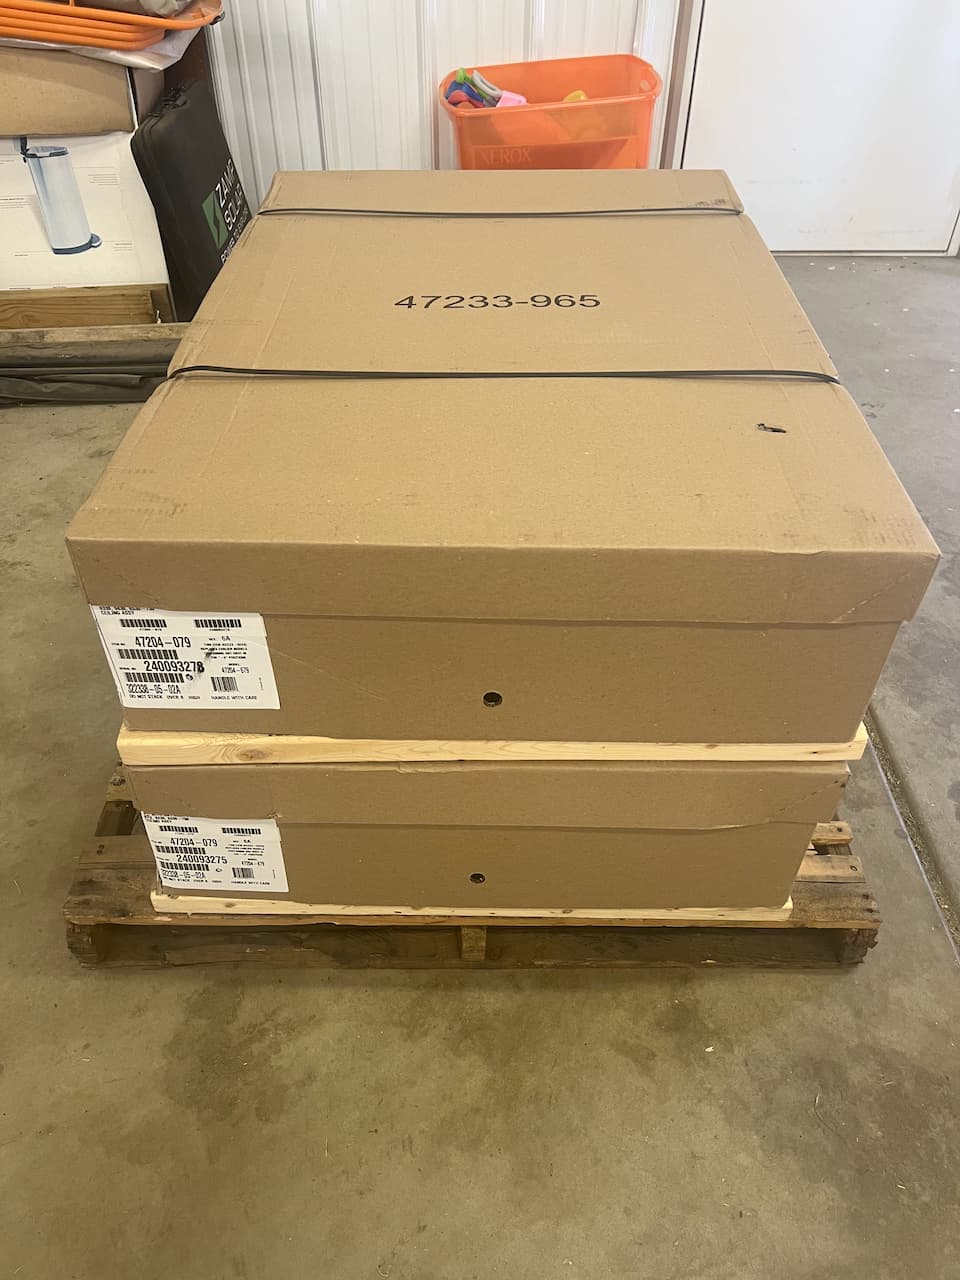
The new units were delivered today. Great experience ordering through Dyers RV too. Good price compared to other retailers online and shipping was only $10 and it included lift gate service and the driver was able to get the pallet in the barn.
Now I just need to get them installed. Shooting for this weekend, but it’s supposed to be over 100 F over the next few days in the Denver, CO area. and not sure I want to spend time on the roof in that heat. LOL
Installation is complete and successful. The units are working and blowing nice cold air and managed to cool the interior down from the mid 90’s to the mid 70’s in a few hours (it was still around 97-100 outside).
It was really a straightforward install process, with the only challenge getting the old ones down and the new one up on the roof. Luckily my neighbor has a tractor and a fork attachment to help in that regard.
These are the steps I went through to remove and install.
Removal
Remove the A/C shroud
Remove the four nuts (3/8" socket) holding the evaporator cover down
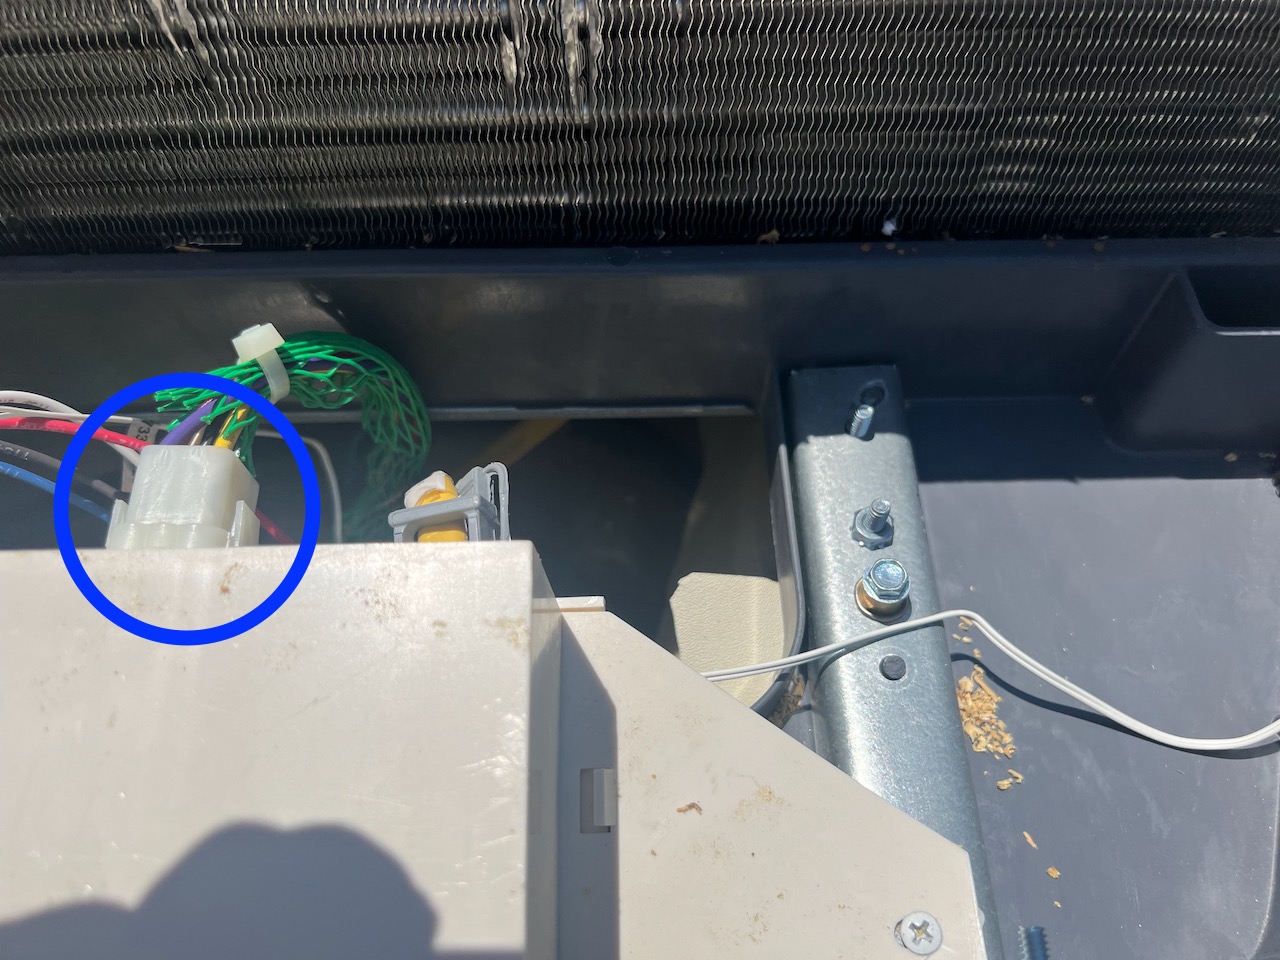
Remove the control box electrical connector (after cutting power for the unit in the breaker panel)
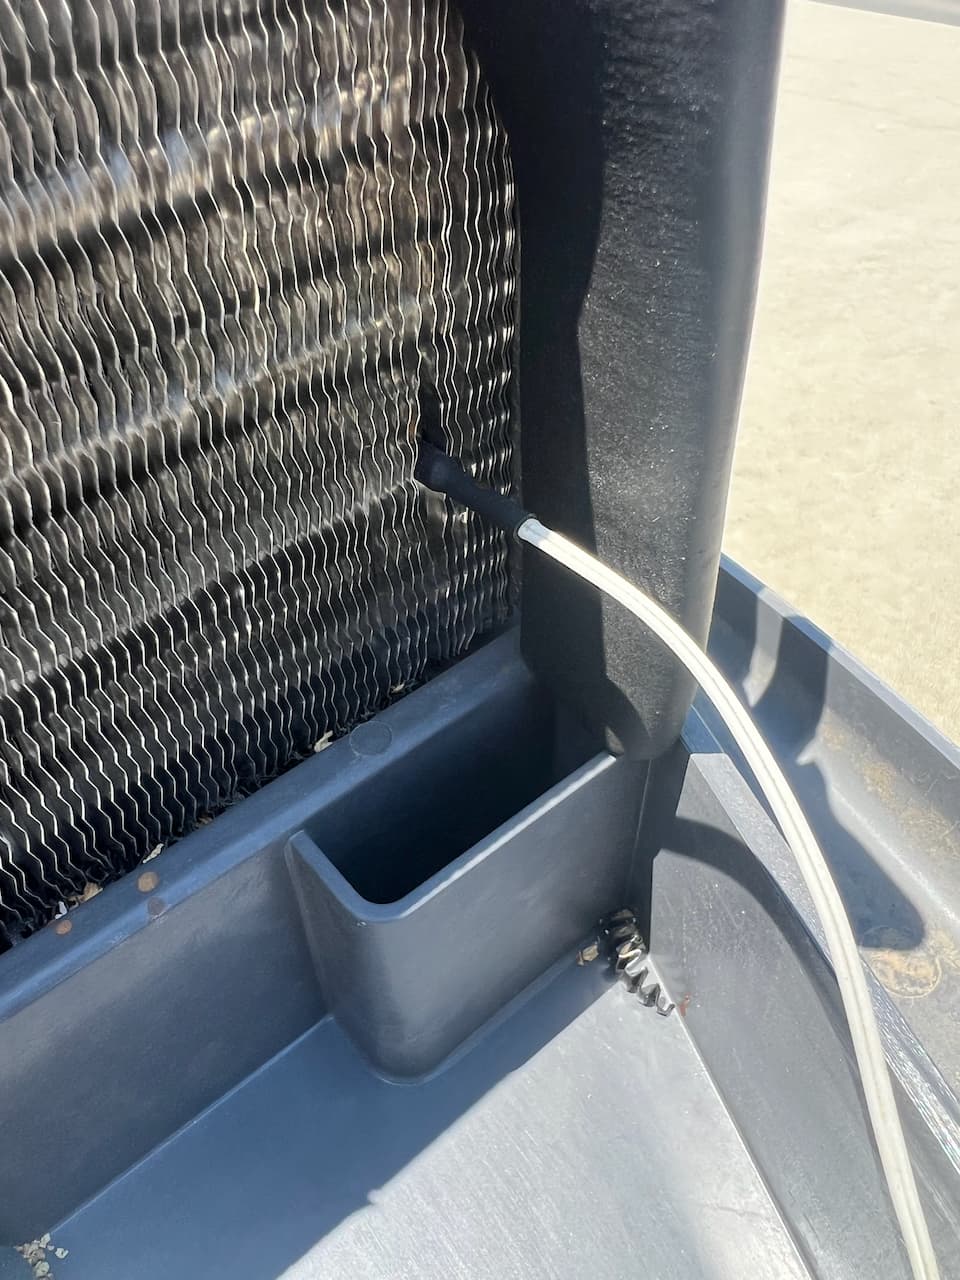
Remove the freeze sensor for the evaporator coil
Unscrew the control box and tuck it down into the air box opening (it stays on the RV as the new units don’t include a new one)
Remove the four mounting screws (5/16" socket) (two in the front near the the control box and two in the back by the squirrel cage fan)
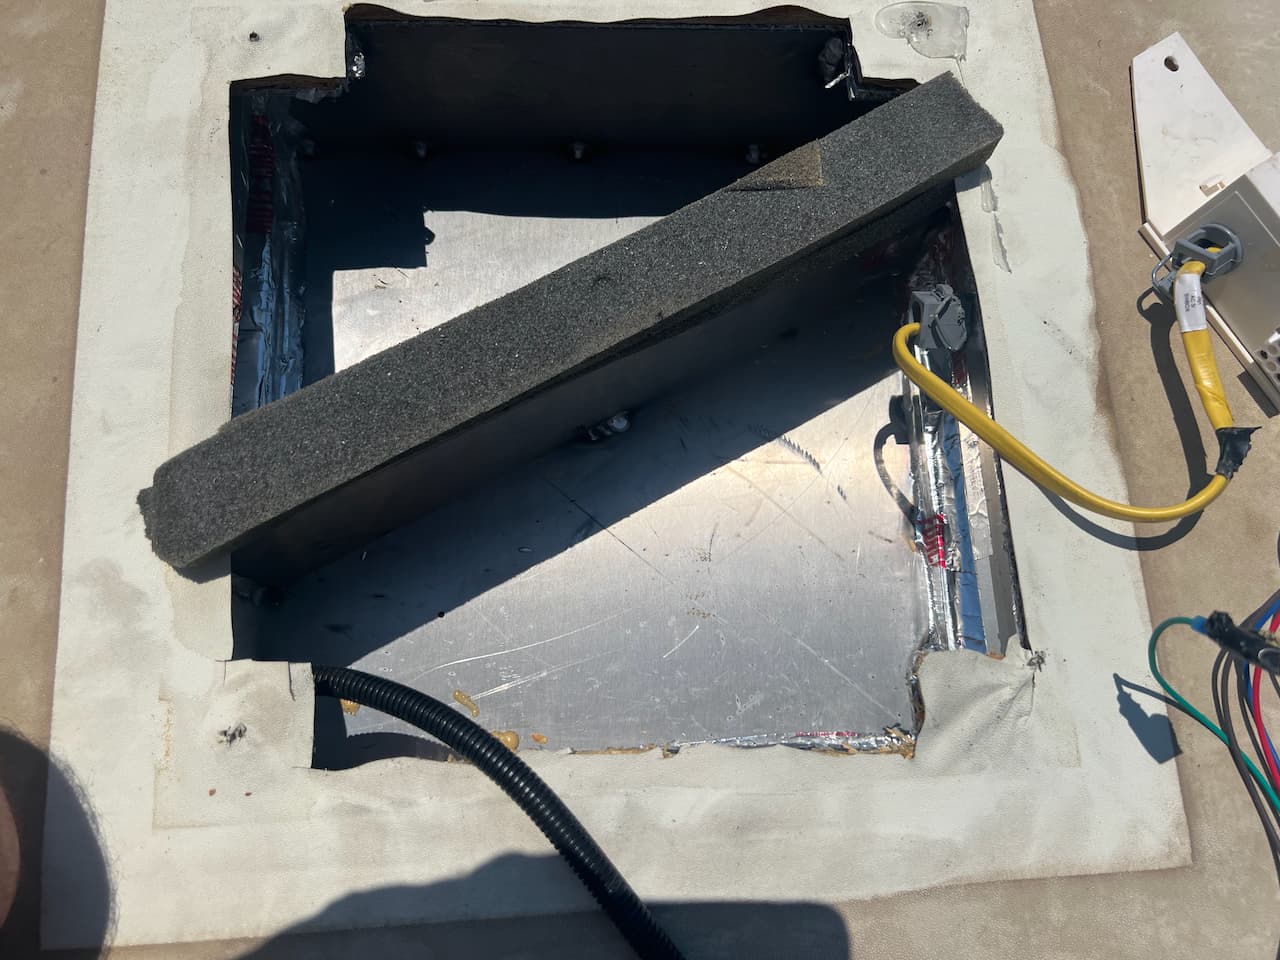
Lift the unit up off the opening and set to the side (Vanleigh used some sort adhesive on the gasket so I had to use a scraper to break the gasket free)
Clean out the area on the roof and the air box opening (I found a bunch of sawdust, wood pieces and dead moths and some loose masking tape that I think was the source of an annoying flapping sound when the the units were running)
This is good time to inspect the air box and address any breaks of the foil tape to seal the duct work openings
Installation
Lift the new unit onto the roof opening trying to align the holes in the roof with the attachment points on the unit where the mounting screws are used (I found it helpful to start the front two screws just enough so that they are visible through the bottom of the unit but not yet contacting the roof. This allows you make minor adjustments if needed. If you get the front two lined up then the rear two should be lined up as you can’t see the rear holes)
Tighten down the four mounting screws equally to compress the gasket an create a good seal being careful not to over tighten or strip out the screws (There is small piece of white tape on the inside part of the gasket that you can see/feel at the front opening. When that piece of tape starts to compress that indicates a good seal on the gasket.)
Reattach the control box making sure none of the wires for the box or 120V AC are damaged
Insert the freeze sensor in the evaporator coil
Reconnect the electrical connector from the A/C unit to the control box
At this point I went down to the RV to test the unit by turning it on and letting it run until I could feel cold air coming out
Replace and secure the new shroud
Have a nice cold one ready and waiting LOL
A few pics of the process-
Old unit with the locations of the mounting screws and freeze sensor with the evaporator cover removed
I’m definitely glad I did this repair myself (with a lot of help from my neighbor!) as it surely saved a ton of cost at a dealership or mobile tech. It’s not very technical as I only needed a Phillips screwdriver, 3/8" & 5/16" sockets for tools. I think it’s really a two person job due to the weight of the unit with the hardest part getting the units up and down from the roof.
Hope this is useful for anyone else thinking about or needing to replace their A/C.
Thanks Stuart, I knew you would do a great job of explaining the process and documentation with photos!! This VanLeigh forum is great and thanks to all who helped each other with their knowledge and experience.
I hope my AC’s have many years of life ahead. But this is the perfect place for help and advice.
Ralph
Just started getting the RV ready for fall travel and found the rear AC unit compressor is locked up (I have 3 AC units with the forward unit being a heat pump). Found that Camping World has a sale on for these units at $999 and, if the local store doesn’t have it, they can order it at the sale price which avoids the shipping fee ($192 in my case). I will use Stuarts instructions on the install. This will be the second unit replaced in my 2019 370GB.